BREAKING NEWS
Showing posts with label iPhone. Show all posts

2012/06/11

Available Download iOS 6 Beta 1 for Developer


The first developer beta of iOS 6 is now available to download for anyone registered with Apple’s Developer program. Arriving as beta build 10A5316k, it represents the first time developers outside of Apple will have a look at the new iOS version, which includes over 200 new features. A few of the most anticipated components of iOS 6 are the new Maps app with turn-by-turn directions, Siri for iPad 3, and FaceTime over 3G.

iOS 6 beta 1 is compatible with iPhone 3GS, iPhone 4, iPhone 4S, iPod touch 4th gen, iPad 2, and iPad 3. There is a separate version available for Apple TV 2 and Apple TV 3 as well. Installing any of the beta builds requires iTunes 10.6.3, and Xcode 4.5 developer preview is also available for developers to download.

Registered developers can get the updates now from Apple’s Dev Center, joining Apple’s developer program costs $99 per yearly membership. For everyone else, iOS 6 will be released in the fall as a free update. 

2012/06/07

How To Redownload & Reinstall Apps on iOS


You can redownload and reinstall any previously purchased apps that have since been deleted from an iOS device, even if you deleted them a long time ago or never even installed them in the first place. Here is how:

  1. Launch “App Store” on the iOS device
  2. Tap on the “Purchased” tab at the bottom of the screen (iPhone & iPod users tap “Updates” and then “Purchased”)


  3. Tap “Not On This iPad” or “Not On This iPhone” to see the list of apps that are not installed on the device
  4. Find the app you wish to redownload and reinstall and tap the download icon, it’s a cloud with an arrow on it

This is what you’d do if you want to reinstall an app you deleted to quickly free up some space on an iPhone, iPad, or iPod that has run out of storage capacity. Likewise, this is the same procedure to restore an app that was accidentally deleted.

Another side to this is you can download and install apps you bought or owned on a different iOS device onto a new different one. All of this is possible thanks to the generous App Store policy that lets you buy an app once and then have free recurring downloads available for free, as long as it’s on an authorized device using the same Apple ID.

How To Enable Closed Captioning on iPhone, iPad, and in iTunes

Closed Captioning places written text at the bottom of video content, allowing for anyone to read along with the video rather than listen to the audio. This is an essential feature for certain accessibility purposes and for individuals who are hard of hearing, but it’s also just a useful feature to enable if you want to watch a movie silently and read subtitles.

We’ll cover how to enable Closed Captioning on the iPhone, iPod, iPad, and also in iTunes for videos on Mac OS X and Windows.

Enable Closed Captioning on iOS Videos

This applies to all iOS devices, including iPad, iPhone, and iPod touch:
  1. Launch “Settings” and tap on “Video”
  2. Next to “Closed Captioning” slide the switch to ON

Turn On Closed Captioning in iTunes

This applies to Mac OS X and Windows:
  1. Launch iTunes and open Preferences from the “iTunes” menu
  2. Click the “Playback” tab and check the box next to “Show closed captioning when available”


Find Closed Caption Supported Video in iTunes

Enabling closed captions is only useful if you have video that supports it however, and thankfully many videos offered through iTunes do. The process of finding compatible video is the same in iTunes on iOS, OS X, and Windows:
  1. Open iTunes and using the search box in the upper right corner, type “closed caption” and hit return
  2. All video content that is returned should support closed captioning, individual videos can be verified by choosing them and looking for the familiar “CC” logo in the description

With Closed Captions enabled all supported videos will use them when played through the Videos app or iTunes.

Oddly, Closed Captioning does not appear to be widely supported in the iTunes Trailers app for iOS. This seems like an unusual oversight for Apple, who is usually very good at maintaining accessibility options, though many of the features have to be enabled separately on a per-case basis, such as text to speech in iOS, screen zoom in iOS and OS X, and the aforementioned closed captioning abilities.

2012/06/04

How to Transfer Music from iPhone, iPod, or iPad to a Computer

Everyone knows how easy it is to get music onto an iPod, iPhone, or iPad with the help of iTunes, but have you ever tried to get music off an iPod or iPhone and onto a new computer? As it turns out, transferring music from an iOS device and to a new or different computer isn’t a feature that is supported in iTunes. Nonetheless it’s easy to do on your own, and we’ll walk you through exactly how to copy all your music from a device and back to a computer.


Transfer Music from iPhone, iPod, or iPad to a Computer for Free

This process will copy all music from the device to a Mac or Windows PC:

  1. Turn off automatic syncing in iTunes, do this through iTunes Preferences > Devices > check “Prevent iOS hardware from syncing automatically”, then quit iTunes
  2. Download iExplorer from here (free for Mac OS X and Windows) and install it
  3. Connect the iPhone, iPad, or iPod to the computer by USB
  4. Launch iExplorer and click the arrow next to the iOS devices name, then click the arrow next to “Media” and then again next to “iTunes_Control”
  5. Drag the entire “Music” folder to a location on the desktop, this is all of your music and it may take a while to transfer


  6. Quit iExplorer when finished
When finished all music will have been successfully copied from the iOS device to the Mac or PC, all while maintaining the music stored on the iPod/iPhone as well.
If you’re satisfied you can stop here, but the Music directory containing the music is arranged in somewhat unusual fashion with songs stuffed into a bunch of “F##” folders with even more meaningless file names. The easiest way to sort and rename all of these files is to use iTunes to import the folder, and if you use iTunes for general media management anyway you’ll want to complete this secondary process as well.

Importing the Copied Music into iTunes

Assuming you want the music you just copied from the iPod or iPhone in iTunes, this is what you need to do:

  1. Disconnect the iPhone, iPad, iPod from the computer and relaunch iTunes
  2. Open Preferences and click on “Advanced”
  3. Make sure “Keep iTunes Media Organized” and “Copy files to iTunes Media Folder” are both enabled


  4. Now go back to the Desktop and drag the entire “Music” folder onto the iTunes icon, or into the iTunes window, causing iTunes to import all the music
If you use the “Automatically Add to iTunes” folder alias, you can also drag the copied Musi folder into that directory to migrate all the music into iTunes.

While in iTunes it’s a good idea to re-enable automatic syncing too from under the Devices preference panel.

Various Use Cases
The uses of this solution are far and wide, but it’s especially helpful if your previous computer becomes unavailable due to a crash or loss, and you end up with a new computer. In such a situation you can’t just sync the device to the new computer without losing data because you won’t have the original backup folders copied over, but this method allows you to keep your music by pullng the library down from the iPod or iPhone to the computer, which can then be synced again as usual. Hopefully future versions of iTunes will handle this natively for authorized devices, because frankly it’s mighty useful.

Using Redsn0w to Jailbreak your iOS 5.1.1


The recently released update to Redsn0w 0.9.12 brings the untethered jailbreak to virtually all iOS 5.1.1 users. The latest version of redsn0w has two paths to the untethered jailbreak and which you use will depend on your iOS device, with A5 hardware being the simplest and other hardware requiring the traditional DFU mode method. Neither is particularly challenging, here they are grouped by device, the instructions below cover both.
Super Easy: iPhone 4S, iPad 2, iPad 3
Moderately Easy DFU Method: iPhone 3GS, iPhone 4, iPod touch 3rd and 4th gen, iPad 1
Note: if you are already jailbroken tethered, launch Cydia to search for and install Rocky Raccoon untether. You do not need to rejailbreak your device.

Jailbreaking iOS 5.1.1 Untethered with Redsn0w

Upgrade to iOS 5.1.1 before beginning, quit iTunes beforehand as well. Depending on hardware you may or may not need to go into DFU mode:
  • Download Redsn0w 0.9.12 (direct link for Mac or Windows) and launch redsn0w
  • Connect the iOS device to the computer and click “Jailbreak”
    • For iPhone 4S, iPad 2, and iPad 3, click “Next” and let redsn0w run the jailbreak
    • For iPhone 4 & 3GS, iPod touch 3rd and 4th gen, and iPad 1, put the device into DFU mode: hold Power button for 3 seconds, continue holding Power and now hold the Home button for 5 seconds, release Power button but hold home button for another 15 seconds>
  • Let Redsn0w run and install the jailbreak, the device will reboot itself and you will be able to find Cydia on the home screen to verify the device is jailbroken
When finished, you can reboot the device freely without having to connect it to a computer for a tethered boot. The ability to freely reboot is the primary difference between a tethered vs untethered jailbreak.

Download Now!, Redsn0w 0.9.12b1 and Jailbreak your iOS 5.1.1


The popular Redsn0w jailbreak utility has been updated to bring untethered jailbreaks to iOS 5.1.1 on most iDevices. Versioned as redsn0w 0.9.12b1, the tool supports the following hardware on 5.1.1: iPhone 3GS, iPhone 4, iPhone 4S, iPad, iPad 2, iPad 3, iPod touch 3rd and 4th gen, and Apple TV1 and ATV2. The A5 support is identical to that found in the recently released Absinthe 2 for iOS 5.1.1, which focused on the new iPad and iPhone 4S.

If you are already jailbroken tethered with iOS 5.1.1 you can use Cydia to download the Rocky Raccoon untether, you do not need to re-run Redsn0w. Likewise, if you’ve already installed the rocky-raccoon package to untether a 5.1.1 jailbreak there is no reason to download or use the new redsnow tool.

Download Redsn0w 0.9.12b1

These are direct download links from the iPhoneDevTeam:
Windows users must run redsn0w in administrator mode.
If you like to follow guides, here is a simple tutorial on using Redsn0w for an untethered iOS 5.1.1 jailbreak.

2012/06/02

How to Make Space Available Quickly, When your iPhone or iPad Not Enough Available Storage


You’ve been downloading tons of apps, books, music, and movies galore, and when you go to download the latest great app you find yourself unable to, confronted with a “Cannot Download – There is not enough available storage” message. What are you supposed to do when your iPhone, iPad, or iPod runs out of disk space?

The simplest and fastest answer is to free up some storage capacity by focusing on apps you no longer use, we’ll show you the fastest way to do this so you can quickly get back to downloading the new apps or content you want.

  1. From the iOS home screen tap on “Settings”, then tap “General” followed by “Usage”, this shows us how much space is available and what’s eating it all up
  2. The Usage list is sorted by total size, starting from the top look through the list for apps you no longer use

  3. When you find an app that is large that gets infrequent use, tap on it and then tap the big red “Delete App” button, then confirm the deletion at the alert dialog

  4. Repeat this with any other apps you don’t use often until you have sufficient space available

This is by far the quickest way to quickly free up storage in iOS, because virtually everyone has a handful of apps that they no longer use. When you’re satisfied with adequate capacity being made available again, go back to the App Store or iTunes and you’re free to download again.

What if I want to use the deleted app again? Is it gone forever?
Thanks to iCloud, App Store, and iTunes policies, Apple allows you to re-download owned content and apps as many times as you want to your authorized devices. This means you can delete an app that doesn’t get use now, but download it again at any time for free in the future if you find yourself needing that app again. Whether it’s a few weeks or years later, Apple doesn’t care, once you own the app it is yours, and they’ll store it for you. This generous policy applies to things bought from the Mac App Store as well.

Removing apps isn’t enough, I’m always running out of space
If you find yourself frequently running out of storage space on iOS devices, consider following some general tips to free up storage space to further minimize storage usage on iPhones, iPads, and iPods. Things like regularly downloading pictures, streaming music, deleting movies after you’ve finished watching them, all can make a giant difference.

Shouldn’t I just upgrade to an iOS device with a larger capacity?
This is a matter of choice and opinion, but what we’ve figured out is that you’ll almost always fill up any size device you get regardless of it’s disk capacity, whether it’s 16GB or 64GB. If you find yourself constantly needing disk space, it’s worth considering the upgrade to a larger size at the next release of a product, but generally speaking we always recommend getting the cheaper models, particularly in regards to iPads.

2012/05/31

The Trick to Activate and Use Text to Speech on iPhone & iPad


The newer versions of iOS include a fantastic text to speech engine that lets you select any text and have it spoken to you. This basically means you can have an iPhone, iPad, or iPod touch read you the content of any web page, notes, text files, or even eBooks and iBooks. Before you can use the text to speech function though, you have to enable it.

Enabling Text to Speech in iOS 

  1. Launch “Settings” and tap on “General”
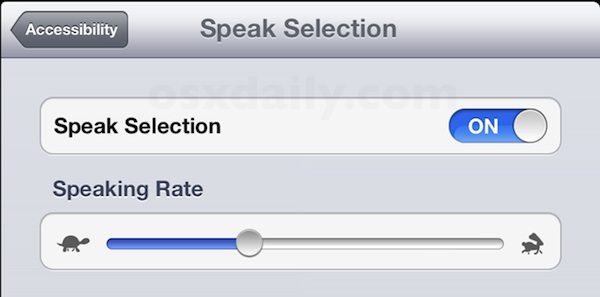
  2. Scroll down to “Accessibility” and tap on “Speak Selection”
  3. Slide to “ON” and adjust the “Speaking Rate” slider to an appropriate setting


Now that that speech feature has been enabled, it’s time to use it.

Using Text to Speech in iOS

  1. Tap and hold on any text until the selector tool comes up
  2. For a single word, tap “Speak”, otherwise to speak everything tap on “Select All” followed by “Speak”


Once speech has started the “Speak” button turns to “Pause”, making it easy to halt and resume any spoken text. You’ll notice the voice is that of Siri’s, which is also the voice of Samantha in Mac OS X which you can add yourself if you haven’t done so yet.

With speech enabled, speaking text is available in just about any app as long as you can select the text. This works perfectly in Safari, Notes, Instapaper, Pocket, and even iBooks if you want stories read to you, though you’ll have to select all the text again on each page when it’s finished reading the current page. Preferably a future version of iBooks will just include the speech engine natively and we won’t have to do that. Anyway, enjoy!

2012/05/29

Set Background Picture or Wallpaper on iOS


You can take picture or wallpapers for iOS, but how do you set those images as the background on an iPad, iPhone, or iPod touch? It’s a very quick and simple process on any iOS device once you learn how.

Assuming you have already saved an image from the web or email, which is done by tapping and holding the image, here is how to set that saved picture as the wallpaper:
  1. Tap “Photos” and tap on the picture you want to set as the wallpaper
  2. Tap the arrow icon in the corner and choose “Use as Wallpaper”
     
  3. Use gestures to size and place the wallpaper as you want it to display on the screen
  4. Now select either “Set Lock Screen” or “Set Home Screen” or “Set Both” if you want the image to be   set as the background for both 
  5. Close out of Photos to see the new background

You can also make these changes through the Settings app by tapping on “Brightness & Wallpaper” and choosing from either the default options from Apple or anything in the camera roll, but all in all the Photos app is easier to flip through pictures with and ultimately is less daunting for less technical folks.

This is a surprisingly common question for people who are new to the iPad in particular, I’ve had to show this to numerous friends who are otherwise very geeky individuals. If you already knew this, great, if not, now you do.

How To Transfer Outlook Contact to an iPhone Without Using iTunes


Have you ever needed to move an entire Outlook contact list to an iPhone without using iTunes to sync the device to a computer, and without deleting the contacts already stored on the iPhone? No problem, here’s a simple two stage process on how to migrate all contacts from a Windows PC with just about any version of Outlook. This guide will also work with an iPad or iPod touch.

Exporting the Outlook Contacts as iOS Ready vCards

From Outlook on the Windows PC:
  1. Select all contacts in Outlook and forward them all to yourself as vcards
  2. Save all the attachments as vCards in a temporary easy to find folder, such as c:\temp
  3. Open a command prompt (Start menu, Run, type “command.com”) and type the following commands:
    cd c:\temp
    copy /a *.vcf c:\allcards.vcf
The last commands are essential because it joins all of the Outlook contacts together into a single vCard file that can then be easily imported into iOS and the iPhone.

Importing the Outlook Contact List Into the iPhone

Your next step is to use the traditional email method of transferring contacts to the iPhone without the assistance of iTunes. You should probably back up your iOS device before proceeding just in case the Address Book gets messed up:
  1. From Outlook, create a new email and attach the newly created “allcards.vcf” file to it, send this to whatever email address is setup on the iPhone
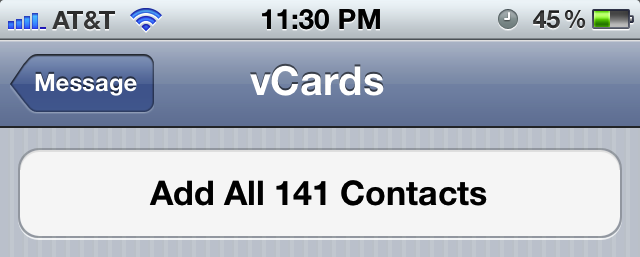
  2. From the iPhone, open the email address and scroll down to the attachments list, tap on the “allcards.vcf” file and then choose “Add All ## Contacts”

 
Verify the import worked by returning to the iPhone home screen and tapping on the Phone icon and then “Contacts”, where the Outlook contacts should now appear within the iOS Address Book alongside any other contacts that previously existed.

This is a great tip for people who are switching from Windows, changing jobs or computers, or if you just want to pull a long existing contacts list to an iOS device without having to sync and associate the device to that computer.


osXdaily

Is This The Next iPhone?


A series of pictures have surfaced that claim to show parts of the next iPhone in both black and white colors (iPhone 5, iPhone 6, call it what you want). The most notable images are of the rear shell of the alleged next-gen iPhone, where the Apple  logo and “iPhone” tag are printed, and show what looks like an all new aluminum unibody construction. The device also appears to have sufficient room to accommodate the larger 4″ display that has been heavily rumored.

The images were obtained and published by 9to5mac apparently from supply chain sources, though the machine cut lines shown inside the shell could indicate these are prototype pieces and may not precisely resemble the final shipping device.

Other notable features shown in the photos are a smaller power adapter port at the bottom of the device, redesigned speaker grills, and the headphone jack appears to have been moved to the bottom of the device.

The redesigned enclosure and 4″ screen fit nicely within our recent list of likely rumors about iPhone 5, other expected features include 4G LTE support, a faster processor with more RAM, iOS 6, and a better camera.


The next iPhone is assumed to debut in the fall of this year, sometime in the September or October timeframe.

2012/05/28

How To Back Up an IOS Device, When iCloud is Unavailable


You can continue to create local backups of iOS devices even if you rely primarily on iCloud for storing backups. This is a really useful technique if an iPhone, iPad, or iPod ran out of iCloud storage space and don’t want to deal with managing it manually at the moment, or you’re just temporarily without internet access and want to make a quick backup to the computer.
  1. Open iTunes and connect the iPhone, iPad, or iPod to the computer
  2. Under the “Summary” tab look for “Backup” and check the radio box next to “Back up to this computer”
  3. Click “Apply”
  4. Right-click on the device in the iTunes sidebar and choose “Back Up Now”
You can verify the backup is stored on the Mac (or PC) by going to iTunes Preferences, clicking on “Devices” and making sure the most recent backup matches up with the current time and date. Down the road if you reconnect to iCloud and backup there again you can always delete these local backups directly from iTunes and reclaim the disk space.

When you get iCloud capacity or internet access again, don’t forget to return to the settings and adjust Backup options to “Back up to iCloud” again when you are finished. Otherwise your iOS device will continue to want to backup to a local computer rather than iCloud.

Steve Jobs would have gone ‘mad’ over Siri’s performance


Poor unloved Siri. The voice assistant software with “an attitude” may have helped Apple garner a lot of attention during the iPhone 4S’ launch and made it the talk of the nation, but it’s now suffering some internal backlash. The problem is apparently more serious than reports that surfaced a month ago that said the late Steve Jobs wasn’t a fan of the name – something that took many efforts of convincing from Siri’s then CEO – until Jobs reluctantly accepted it. Now some reports are coming out saying that the performance of Siri would’ve sent Jobs over the edge.

With Siri not living up to expectations, this is apparently how said Apple insider justifies the belief of how the late Apple CEO “would have lost his mind” over Siri’s inadequate performance.  What’s even worse, the former employee also said that those who currently work in Apple are all “embarrassed” by the performance of the voice recognition software.  My thoughts: “That’s quite a sweeping generalization to make.”

Given that Siri is currently still in beta, it’s to be expected that it would hiccup every now and then when doing its job. The latest bump in the road was when Siri named Nokia’s Lumia 900 as ‘the best phone ever’, a mishap that was quickly rectified by Apple. The voice assistant also had a bumpy ride in the first few months of its life, which include several lawsuits for false advertisement and stage fright in other countries.

Despite the put down, like Apple’s many products, Siri is still considered as the one to beat. Is this a case of perception winning over reality? Whatever the reason, Siri seems to have set a new benchmark for voice recognition feature that other manufacturers and companies are trying to replicate and improve upon.

I say let’s give Siri a break. The feature probably is not even used that often by iPhone users, once the few first days of excitement die down.  We are, however, still excited about what Google is planning to bring to the voice recognition software table, which is expected to come later in the year.

2012/05/25

Step by step to Jailbreak iPhone, iPad, or iPod touch on iOS 5.1.1 with Absinthe 2.0


The newly released Absinthe 2.0 jailbreak app may be one of the easiest to use jailbreaking tools of all time. If you’re interested in exploring the jailbreak world or running third party tweaks on an iPhone, iPad, or iPod touch, here is how to jailbreak any such device that is running iOS 5.1.1, yes that includes the new iPad 3 and iPhone 4S.

If you are already jailbroken on iOS 5.1.1 but stuck with a tether, just launch Cydia and search for “Rocky Racoon” to untether your existing device. You do not need to run Absinthe. For everyone else, here is how to jailbreak iOS 5.1.1 untethered:
  1. Connect your iOS device to the computer via USB and do a quick manual local backup by right-clicking on the device name in iTunes and choosing “Back Up”. You will need this in the odd event something goes wrong.
  2. Download Absinthe 2.0 and launch the Absinthe utility
  3. Click on the Jailbreak button and let Absinthe perform its magic, this may take a minute or two
  4. Absinthe will inform you when the jailbreak is finished, when done look for the Cydia icon on the iOS home screen
  5. Launch Cydia and enjoy
That’s about it. Because Absinthe 2 is untethered, you are free to reboot at any time without being attached to a computer. If you want to undo the jailbreak at any point you can restore from the iTunes backup you made and be back to normal.

Download Now! Absinthe 2.0 Jailbreak for iOS 5.1.1 Released


The much anticipated Absinthe 2.0 jailbreak has been released by the JailbreakDreamTeam. The utility allows for an untethered jailbreak of iOS 5.1.1 on virtually all idevices, including iPad, iPad 2, iPad 3, iPhone 3GS, iPhone 4, iPhone 4S, and iPod touch 3rd and 4th gen.

An untethered jailbreak means the device is free to reboot on it’s own without boot assistance and without connecting to a computer.

In order to use the free tool, you must be running iOS 5.1.1 as no other versions are supported.

Download Absinthe 2.0

Users who are already jailbroken on iOS 5.1.1 but stuck tethered can use the Rocky Racoon tool to untether their jailbreak, a free download found on Cydia.

2012/05/24

Rumors About iPhone 5, And Most Likely Be True


iPhone rumor season is in full bloom and there’s a lot of crazy speculation going on out there. We’ve weeded through all the iPhone 5 rumors and picked nine that are most likely to be true, though it’s important to remember that until Apple officially announces something it’s all speculation:
  1. 4″ Display – A larger screened iPhone has been rumored for a long time, but now Reuters, WSJ, and Bloomberg have all piled in with reports that appear to confirm the 4″ display is a reality.
  2. Redesigned Case – To accommodate a larger screen the iPhone enclosure is bound to get a redesign. Nobody knows what it will look like or if it will be made of glass, aluminum, liquid metal, or a combination of all three, but with longstanding rumors that Steve Jobs worked on the design before he passed away, you can rest assured it will be beautiful.
  3. 4G LTE – True mobile broadband is bound for the iPhone according to a handful of rumors, and with the 3rd gen iPad receiving the 4G treatment it’s a pretty safe bet the iPhone will follow suit.
  4. 10 Megapixel Camera – The smartphone is killing the point-and-shoot camera market, and the next iPhone is probably going to include a camera so good that it will drive a final nail into the consumer digital camera coffin. Why 10MP? The iPhone 4S has an 8MP camera, so it’s a logical step.
  5. A5X CPU & Quad Core Graphics – It’s very likely Apple will borrow the iPad 3 A5X CPU with it’s quad-core GPU and jam all of its power right into the next iPhone. Apple regularly shares core hardware components between iOS devices, so this isn’t particularly outlandish.
  6. 1GB RAM – If they borrow the A5X from the iPad 3, it’s very likely the next iPhone will have 1GB of RAM like the iPad too. Apple generally finds specs meaningless, but geeks love this stuff, and 1GB of RAM means faster apps, improved multitasking, and an all-around boost.
  7. iOS 6 – Not much is known about iOS 6, but everyone is expecting a big preview at WWDC in just a few weeks. Rumored features include all new Maps app with advanced abilities like turn-by-turn directions, further iCloud integration, third party widgets for Notification Center, third party Siri support, and much more.
  8. “The new iPhone” – Taking another page from the book of iPad, the next iPhone probably won’t be called iPhone 5 at all, it’ll be named simply “The new iPhone”. People will still call it the wrong name anyway though.
  9. September or October Release Date – The release timeline for new iPhones appears to have shifted from earlier in the year to fall, assuming the next iPhone is released on the same schedule as iPhone 4S was that is. Expect a launch and release sometime in September or October of this year.
Those are looking like the most likely features and specs of the next iPhone, but there are also a few other vague possibilities. There is really nothing to support these rumors except analyst claims or web conjecture, so we’ll file these safely under “wishful thinking” while we all cross our fingers hoping they end up true.
  • 32GB Base Model – My iPhone fills up much faster than my iPad, it stores tons of photos and tons of music, and frankly 16GB is just too small to be standard anymore. 32GB, 64GB, and 128GB storage options would be fantastic.
  • Magsafe Dock Connector – MagSafe power adapters are one of the greatest little Apple inventions, it would be a huge improvement to bring to the iPhone and iOS lineup, so let’s hope it happens
  • T-Mobile – Plenty of T-Mobile customers are using unlocked devices on their network anyway, so hopefully Apple and TMO USA can finally work out a deal to bring the iPhone to their network.
  • China Mobile – The largest cellular carrier in the world with 655 million subscribers, China Mobile has a paying customer base that is two times the entire population of the USA. If Apple wants to continue it’s explosive growth in China, landing a deal with CHL is vital, and this could be the year, and the device, to finally do it.
What do you think the next iPhone will have? What should it have? Let us know your thoughts and speculate away.

Features Airplane Mode with Wi-Fi & Bluetooth can be Enabled on an iPhone or iPad


If you want to use an iPhone or iPad during a plane flight, you’re supposed to turn Airplane mode on to disable the built-in wireless communication aspects of the device. Airplane mode disables cellular and 3G/4g connectivity, GPS, wi-fi, and Bluetooth capabilities, but how are you supposed to use inflight wi-fi service if everything is turned off? The solution is to enable Airplane mode as usual, but then manually turn on Wi-Fi or Bluetooth separately on the iOS device:
  • Launch Settings and flip “Airplane Mode” to “ON”
  • Tap on “Wi-Fi” and flip the switch to “ON”, join the wireless network as usual
  • For Bluetooth use, within Settings tap on “General” and then tap “Bluetooth” to enable separately
Either choice will not reenable the cellular modem or connection, typically keeping you within the realm of acceptable behavior for most flights. You’ll probably want to check with the specific airline before doing this, but chances are if they offer inflight wireless service then it’s acceptable behavior.

Outside of flying, using Airplane mode but turning on wi-fi is an easy way to temporarily turn an iPhone into an iPod touch, letting you use wifi networks but avoid any potentially expensive voice or data roaming charges.

Find Which Direction You Are Facing With iPhone & Maps

The iPhone has the Compass app to help show you which direction you are facing, but if you’re in an area with cellular reception a much more practical and useful approach is to use the Maps app. This lets you see which direction you are facing on a map of the area, so you can quickly see landmarks or whatever else you are looking for.

This will work on any iPhone, iPad, or iPod touch with internet connectivity, though it’s likely most useful in the 3G/4G enabled models for obvious reasons.
  • Launch Maps app and tap the Arrow icon to locate where you are
  • When Maps has centered on your location, tap the Arrow icon again
The arrow icon will switch to show what looks like a flashlight beam coming out of the point, this orientates the Maps app based on which way you are facing. Use this feature to either quickly find North, South, East, and West, or if you’re in the middle of the nowhere you can use it to find your way to the nearest road or familiar landmark that you find on Google Maps.


The primary weakness with this method is that iOS and Google Maps does not store or cache maps data locally on the device. This means if you’re out of cell range and you use the compass feature of Maps, you’ll just have a direction pointed out on a blank grid, unable to find any meaningful landmarks or points on the Map. This prevents an iOS device from serving as a true GPS replacement for serious outdoor uses, but if you’re in a bind it can be better than nothing.

This feature will not work if location services is disabled, a feature some people turn off because it can reduce the life of a battery charge on some iOS devices.

2012/05/22

Review App Sidecar, See What Your Call Partner See With a Flurry of Clever Features


What do you do when your startup gets off to an OK start but not a great one? Hunker down and figure out ways to lure users? Or sweep all the junk off the desktop and start over?

You start over, of course. It’s also known as “the pivot.” The overheated Internet space is based on catching lightning, and if the skies aren’t tossing bolts, you pick up your rod and head for another field. In a tech environment where you can go from pivot to a billion dollars in barely a year, perseverance is lunacy.

That was the reality facing Socialeyes, a startup co-founded by Rob Glaser (former CEO of Real Networks) and Rob Williams (the one-time Microsoft wizard involved in numerous startups, including Avogadro). The company’s idea to deliver persistent video connections between friends and workers wasn’t breaking out. “A VC looks for home runs,” says Williams. “We didn’t have that.”

“We’d raised $5 million [from Ignition Ventures],” says Glaser. “We could stick it out, or hard pivot.”

They chose to seek the lightning. Glaser came up with a new idea: Putting muscle into the phone call, or “reimagining telephony,” as he puts it. And Socialeyes adopted a new name, too — Sidecar.

In the middle of a phone call, you can use Sidecar to share collaborative data -- like a point on a map. Image: Sidecar
 Along with the new idea, embodied in a free app available today for iOS and Android, comes a compelling pitch: “In smartphones, all the innovation so far has been in data,” says Williams. “We want to let you use the capabilities of your phone into the calling experience.”

Sidecar actually offers two kinds of service to its users. First of all, it’s an alternative to actually paying for phone calls. Sidecar VOIP calls are free. This works not only when Sidecar users call others signed up for the no-cost service, but when they use Sidecar to call anyone in the United States or Canada.

The second, and flashier, service is dubbed Smart Calling, a collection of tasks that you can perform during a call. The home screen highlights these features in a circle arrangement that vaguely evokes an old-school dial phone.

Now here’s the coolest part. The flagship task — and the one that owes the most to video roots of Socialeyes — is See What I See. It’s a live-streaming, real-time video feature in the early stages of an ascendency that will ultimately change what we watch. Sidecar understands that while FaceTime is cool, it’s much more interesting for people to share their surroundings than unflattering views of their own sorry faces. So the See What I See feature offers streaming video from the camera on the back of the phone. (Users might want to restrict heavy use to the times when they’re on Wi-Fi — streaming video can rack up data charges.)

Picturephones never worked because the reality of two people on a phone call looking at each other is a vanity-killing, awkward proposition. But borrowing someone’s eyes at a given moment is another matter entirely. The possibilities of letting people share their visual points of view are endless. And if users really want to use the front camera for face-to-face video calls, Sidecar allows that, too.

See What I See is similar to a feature offered by another pivoting startup, Color, but the difference — the key difference as far as Sidecar is concerned — is that Sidecar does it within a phone call.

In part to punt on privacy issues, See What I See can’t be recorded. The recipient can choose to capture a still frame from the stream.

The other features offered on launch are photo-sharing, contacts and maps, all tasks that offer obvious benefit two people who need to share information during a call. In addition, Sidecar provides something called Whisper Text, which is like SMS inside of a phone call. You can use Whisper Text for those not-rare-enough moments when you can’t make out what the other person saying during a mobile call.

Expect other features to come later. The current ones were only the top choices in Sidecar’s list of 10 that may work (the one directly beneath the bubble was shared browsing). The trick is not to simply implement collaborative tasks, but to choose features that organically enhance a phone call. Sidecar has a rough measure of where to draw the line: “The moment the person has to use two hands on the phone, it’s not for a phone call,” says Williams.

Sidecar, available on iOS and Android, is free. Glaser says that, in true start-up fashion, the company will sweat revenue-generation issues later on. Possibilities include offering premium services, or licensing core technology. “If you have tens of millions of users,” he says, “there ought to be a way to monetize them.”

But first you have to get those millions to sign up — and then sign up their friends. Will smartphone users get excited about stuff they can do while making actual phone calls? Sidecar will find out. If all goes well, no need to re-pivot.

To see Sidecar in action, watch the video below.

2012/05/21

Griffin’s SmartTalk iPhone Speakerphone using Solar Powered

I was talking on my iPhone in my car a couple of years ago. My daughter was with me and she pointed out that my speed slowed by six miles per hour as soon as I started talking. Since I was on the highway at the time, this was not a good thing. I’ve since become much more responsible about using my phone in the car, and one way I do that is to use a speakerphone if it is absolutely necessary for me to talk in the car. Keeping them charged can be a nuisance. Griffin’s new SmartTalk Solar Speakerphone  is not only bluetooth capable, it is solar powered, so the more you use it, the more it powers up.

 Griffin’s SmartTalk Solar Speakerphone with case


The SmartTalk can be paired with two different smartphones at the same time and both can be used at the same time. Once a phone has been paired with the unit the SmartTalk will auto-connect each time you enter its range with your phone turned on.


Top view
The SmartTalk, which has an MSRP of US$69.99, works with iPhone 3G, 3GS, 4, and 4S. It also works with the phone’s voice command features.


Back view with power cell


Using the product

Before using the first time, the unit must be fully charged. There is a charger and cable included with the SmartTalk or you can choose to leave it in the sun to charge. If you choose this second option it will take nine hours for the unit to fully charge. You can also do what I did and just plug it into a USB charger in the house and charge it.

It is very easy to pair the SmartTalk with the phone. Select Settings > Bluetooth on your iPhone and make sure Bluetooth is turned on. Press and hold SmartTalk’s Multi-Function button for about three second until the blue and red LEDs flash. Select Griffin from the Devices list. Connected will appear, and it’s done.

 MultiFunction button

Using the SmartTalk is just as easy as the pairing. You can answer calls, redial the last number, use voice control, and disconnect, all using the one Multi-Function button. You can also deal with call waiting, mute, and easily switch from the unit back to your handset. The instruction booklet that accompanies the unit has text that is actually big enough to read, has useful images, and contains all the information you need to quickly start using the SmartTalk.

The SmartTalk fastens to the car window with a plastic frame and two suction cups. They grab tightly and hold in place. Two extra suction cups are included with the package.

The first time I used it, I punched up Siri, told it to call someone in my address book. The call immediately switched to the SmartTalk while Siri informed me that she was placing the call. The voice quality on both ends of the call were excellent. There was no road noise on either end and I was able to increase the volume by pressing the plus button.

Do I recommend it? 

I do. It is easy to use, has good quality sound, and it works perfectly with my iPhone 4S. And it is easy to use. I know I already said that, but it is a big deal to me.


Product: SmartTalk Solar Speakerphone

Company: Griffin
List Price: US$69.99


Copyright © 2014 Deepersolids. Designed by OddThemes