BREAKING NEWS
Showing posts with label Laptop. Show all posts

2022/04/26

How to Fix When Click Not Working on Mac

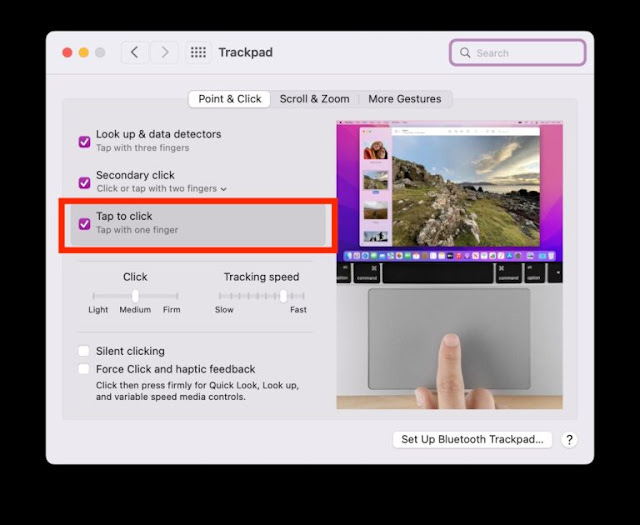
 Tap to Click is a popular feature for Mac trackpads that allow users to tap on the trackpad to perform a click, rather than exert physical pressure to physically click down on the trackpad. Many Mac users like to use Tap to Click, so if you find it’s suddenly not working, or not working as expected, it’s understandable why you’d be bothered.


 Some Mac users have found that Tap to Click is not working as expected on their MacBook Pro, MacBook Air, MacBook, or Magic Trackpad, often since updating to macOS Monterey or later. If you encounter this issue, read along to troubleshoot and fix the problem.

A Quick Fix for Tap to Click Not Working on Mac

Often you can do a simple quick fix to get Tap to Click working again on the Mac, and that is simply disabling and then re-enabling Tap to Click again.

        1. Go to the  Apple menu and choose “System Preferences” 

        2. Go to “Trackpad”

        3. Uncheck the box for “Tap to Click”

        4. Click around on the Mac for a minute with a typical pressed click, then return back to the Trackpad System Preferences and check “Tap to Click” to enable it again


Simply turning off and turning back on Tap To Click usually remedies most issues with the feature on the Mac.

Full Fix for Tap to Click Not Working Issues on MacOS

You’ll probably want to backup your Mac with Time Machine before beginning this process, because you’ll be potentially installing a system software update, and also modifying system preference files:

        1. Quit out of every open app on the Mac

        2. Go to  Apple menu > System Preferences > and choose “Software Update”

        3. Install any available macOS software update to the Mac (eg; macOS Monterey 12.4 Update) if one is available

        4. From the Finder on the Mac, hit Command+Shift+G (or go to the Go menu and choose Go To Folder) and go to ~/Library/Preferences/

        5. Locate the files named: 

com.apple.AppleMultitouchTrackpad.plist

 com.apple.driver.AppleBluetoothMultitouch.trackpad.plist

        6. Drag these two files to the desktop, or to the Documents folder, this is serving as a backup of the trackpad preferences files

        7. Restart the Mac by going to the  Apple menu then choosing “Restart”

        8. Now go to the  Apple menu and choose “System Preferences” then go to the ‘Trackpad’ preference panel

        9. Configure your trackpad per your usual preferences, and make sure “Tap to Click” is enabled


         10. Tap to Click should immediately start working again as expected

Note About Accidental Click Rejection and Tap-to-Click on Mac Trackpads

Some Mac users have noticed that on modern MacBook Pro laptops with extra large trackpads (for example, the latest 16″ MacBook Pro line), that Tap To Click works most reliably in a smaller rectangle within the large trackpad. Some MacBook Air users and MacBook Pro 13″ and 14″ users have noticed similar issues too, but those laptops have smaller trackpads than the 16″ which may be more prone to ignore accidental input.

Explore where you are using Tap to Click, and if you find that the trackpad frequently rejects or ignores taps on the edges of the Mac trackpad, try tapping instead a little closer to the center of the trackpad, as that alone may resolve any issues you are experiencing. 

For some users, tapping towards the perimeter of the trackpad surface does not consistently register Tap To Clicks, whereas tapping directly in the center of the trackpad does reliably produce a tap to click function.


This may be due to the accidental input rejection feature that is built into the trackpads, which is generally very intelligent at determining accidental input and clicks, but sometimes may be overzealous and think a legitimate click should be rejected. The most obvious example of this happening is when Tap to Click works when used more towards the center of the trackpad, but if you pick an edge of the trackpad to tap on, you may need to tap several times before Tap to Click registers.

While some of this behavior may be intentional, some of it also may be a bug in some versions of MacOS system software, which is why it’s generally a good idea to install the most recently available system software updates. For example, some Mac users experienced Tap To Click issues with early versions of macOS Monterey, but those were later resolved in later macOS Monterey system updates.


Red: OsxDaily


2022/04/21

Activate Feature Voice Isolation with FaceTime on Mac

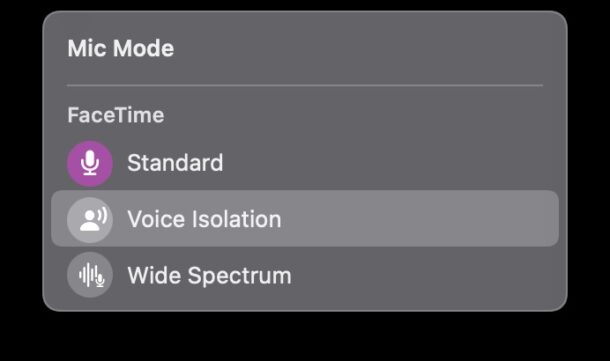
 Voice Isolation mode allows FaceTime on the Mac to emphasize your voice while on FaceTime calls, thereby reducing background noises and sounds. This is a nice feature if you have some background noise going on that may drown out your voice when talking or make you otherwise difficult to hear, whether that’s a loud fan running in the background, a cat meowing, dog barking, a neighbors bad music blasting, or any such situation. You can use this on any FaceTime call, whether it’s video, audio, or group chat.

You’d be forgiven for failing to find any setting for voice isolation or background noise reduction while digging around in the FaceTime preferences, because that’s not where the capability resides. Instead, you use the Control Center, as we’ll demonstrate.

How to Reduce Background Noise in FaceTime on Mac with Voice Isolation

This feature is only available on the latest versions of macOS system software (12.0 or later), so if you haven’t updated yet you will need to do that before having access to the feature.

        1. Open FaceTime on the Mac if you haven’t done so already

        2. Now open Control Center on the Mac by clicking on the little switches icon in the menu bar

        3.  Click on “Mic Mode” to switch the microphone mode


        4. Choose “Voice Isolation” from the microphone mode options


        5. Return to FaceTime and make your FaceTime call as usual, whether video or audio

It’s a little curious that you have to go to Control Center to access the microphone mode to aim for background noise reduction in a FaceTime call, but that’s where the toggle is located. Perhaps in the future there will also be an easy option directly from the FaceTime call or app itself.

This is a feature that is available in macOS Monterey and newer, so if you’re on an earlier version of MacOS you won’t find the feature available.

This feature is really useful if you spend a lot of time making FaceTime calls, whether for personal or professional purposes. You’ll find it works pretty well.

While we’re covering the Mac here, you can also use background noise reduction with FaceTime calls on iPhone and iPad too using the same technology to isolate your voice and reduce background sounds.

Try it out, it works really well. 

You can further improve performance by using a microphone, AirPods, or even the wired EarBuds. In testing with a set of AirPods, I was able to run a vacuum cleaner while chatting on a call, and the person said they couldn’t hear the vacuum at all.

This feature is useful enough that it’s a little surprising it isn’t enabled by default for calls, since most people are making calls to hear a person chat, and not the background noise. Perhaps that will change down the road.


Red: OsxDaily


Convert your Old Mac into a Chromebook with Chrome OS Flex

Ever wanted to use a Google Chromebook running the Chrome OS? If you have an older Mac laying around that isn’t getting much use, you may be interested in trying out Google Chrome OS Flex on the old Mac, which basically turns the older Mac into a Chromebook.  

One potential advantage to this is the Mac gets an operating system that still receives security updates, whereas some old Mac models that are otherwise perfectly great running machines may no longer receive MacOS security updates, and that matters to some users. You also get to tinker around with a different operating system, based on the Chrome web browser. And perhaps you’ll be able to breathe new life into that older Mac that’s otherwise collecting dust? 

A downside however, is that by installing Chrome OS Flex onto the older Mac, the Mac will no longer have MacOS on the computer, since Chrome OS becomes the operating system on that Mac.

Google Chrome OS Flex runs on any Mac from 2010 or newer, so you can get Chrome OS running on hardware that has long stopped being supported by Apple.

If converting an older Mac into a Chromebook appeals to you, you will need a USB flash drive that is 8GB or larger (this becomes the installer drive for Chrome OS), the Chrome web browser (this is where the initial config tool and installer is made), and the Mac must have at least 16GB of storage, and be from the 2010 model year or later.

How to Install Chrome OS Flex on Older Mac

To try this out yourself, you’ll need the Chrome browser. You will also need to be comfortable erasing everything on the old Mac because you need to erase MacOS and all data in order to install Chrome OS Flex on the computer. Do not proceed if you don’t wish to permanently erase that Mac, and do not proceed without a backup of your stuff.

        1. Launch the Chrome web browser on any Mac (you can use a different Mac to create the installer from the destination Mac)

        2. Get Chromebook Recovery Utility here for the Chrome browser and install the extension


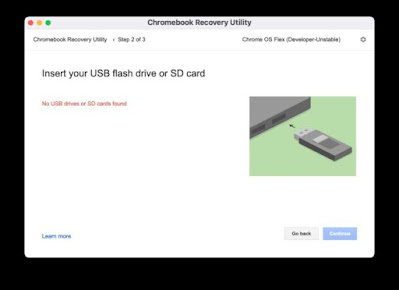
         3. Open Chromebook Recovery Utility within Chrome, and select “Google Chrome OS Flex” as the Chromebook you wish to setup


         4. Insert the USB drive you want to turn into the Chrome OS Flex installer then proceed with the creation of the installer drive 

        5. When the USB installer drive has finished being created, connect it to the Mac you want to format and turn into the Chromebook

        6. With the Chrome OS Flex USB installer drive connected to the Mac, reboot the old Mac and hold down the OPTION key, then select the Chrome OS installer from the boot options menu

        7. Proceed with the installation as shown on screen

        8. Your old Mac will boot into Chrome OS Flex when finished


 You’ll soon be booted into the Chrome OS Flex operating system, and the Chrome OS desktop.

Chrome OS is basically an operating system centered around the Chrome web browser, and you’ll have access to all of the Google apps and tools you’re familiar with, including the Chrome browser, Google Docs, Google Sheets, YouTube, YouTube Studio, Google Drive, Google Calendar, Google Meet, Gmail, and more.


 Red: OsxDaily


2022/04/20

How to Run Windows 11 for free on M1 Mac

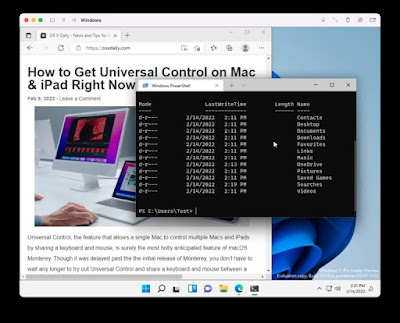
 If you want to run Windows 11 on your M1 Mac, you can now do that, and perhaps best of all, you can run Windows 11 in a virtual machine on the M1 Mac entirely for free. 

We’ll be covering how to install, setup, and run Windows 11 ARM on any Apple Silicon Mac, whether it has an M1, M1 Pro, M1 Max, M1 Ultra, or any other M chip does not matter, it will work just fine thanks to the UTM app.


Note this particular walkthrough is geared specifically for Apple Silicon Macs. Intel Macs offer many other ways to run Windows 11 in virtual machines like within VirtualBox, VMware, Parallels, etc,

 step :

        1. Download the UTM app for free, it’s a virtualizer and emulator application, and drag to the Applications folder to install it on the Mac 

        2. Download the Windows 11 VM for ARM free from Microsoft here (you will need a Windows Insider login for this, which is free to sign up for if you don’t have one already)


       3. Open UTM on the Mac, then click the + plus button to create a new virtual machine

        4. Choose “Virtualize” from the ‘I Want to” screen, then select Windows


        5. Click the “Browse” button and select the Windows 11 VHDX ARM image you downloaded,             with “Import Image” selected, then click Next


         6. Choose the amount of RAM and CPU cores you want to designate to Windows 11 (recommend             to give 8GB RAM or more for better performance), then click Next again

        7. At the Summary screen, choose “Save”

        8. Now click the big Play button to boot the Windows 11 VM and begin setup

        9. Walk through the Windows 11 setup process as usual, choosing your region, account name, etc – Note that networking and internet will not work yet, that takes an additional setup process which             we’ll cover in a moment – thus choose that you have no network connectivity for now and let                 Windows 11 set itself up


        10. Wait a few minutes and Windows 11 will launch running in the VM on the M1 Mac

        11. To get internet access working in the Windows 11 VM, download the SPICE Guest Tools ISO here from the UTM website 

        12.  In the active Windows 11 VM, click the disc icon in the toolbar and choose CD/DVD Iso > Change > and select the spice-guest-tools-xxx.iso file you just downloaded


        13. Open the mounted D:\ drive in Windows Explorer, then run the SPICE Guest Tools installer in Windows, then restart the VM when installation is finished


        14. The VM will reboot and Windows 11 will now be connected to the internet, confirm this by opening up the Edge browser and visiting a fantastic website


And there you have it, you’re running Windows 11 ARM on a Mac with an Apple Silicon processor.

Remember, you must install the SPICE guest tools to have internet access available in the Windows 11 virtual machine, and without it you will not be able to get the virtual machine online. 


Windows 11 ARM runs pretty well on a Mac, though performance with UTM may not be quite as good as some of the other virtualization tools you’ve become accustomed to elsewhere. But as a free solution that is simple to setup, this is more than workable and usable. 


Red : OsxDaily

2015/03/23

Released OS X 10.10.3 Yosemite Beta 5, anyone dare testing it?

Apple has released a fifth beta version of OS X Yosemite 10.10.3 to those participating in the OS X
Public Beta program, or registered in the Mac Developer program. The new build arrives as build number 14D113c and continues to include a focus on the new Photos app for OS X, along with other bug fixes and feature improvements.

The new beta version is available to download now from the software update mechanism of the Mac App Store, refreshing the Updates tab should reveal the download if it’s not seen immediately.


An update to the Yosemite Recovery drive is also available with the OS X 10.10.3 beta 5 download.

There is no known timeline for OS X 10.10.3 to debut, though Apple has stated that the Photos app will be available sometime in “early 2015″. With that said, the beta release schedule is clearing picking up steam, and it’s quite likely that we’ll see a public release of OS X 10.10.3 sooner than later. Apple typically goes through multiple beta versions before unveiling a final build to the public.

The new OS X Photos app will replace iPhoto for Mac, the app looks and feels quite similar to the Photos app experience in iOS that many users have become accustomed to.


red:Osxdaily

2012/06/13

The First Benchmarks of Retina MacBook Pro & MacBook Air 2012


The first benchmarks for the new retina MacBook Pro, MacBook Pro 2012 refresh, and the updated MacBook Air 2012 have shown up from GeekBench and, as you would probably expect, they’re very impressive.

First up is the new MacBook Pro 15″, which is easily the fastest Mac laptop Apple has ever made. The preliminary Geekbench scores top out at 12,303 for the non-retina and 11,844 for the retina model, but it’s important to note the non-retina model as tested has a slightly faster chip speed and so the top of the line next-gen MBP 15″ will likely end up as the fastest.


Each of the 2012 MacBook Air models also show a nice speed boost from the previous generation, but where you’ll really notice a huge performance boost is if you’re upgrading from the 2010 models.


The biggest gains are experienced by the top of the line models, though basically even the slowest models from the mid-2012 refresh are now faster than the 2011 speediest. This is mostly the result of the new Intel Ivy Bridge processor architecture at work, but for anyone who gets an Air or retina MacBook Pro your Mac will feel even faster thanks to their speedy new SSD drives as well.

If you’re thinking about upgrading, any upgrade from last years models are going to be a nice improvement, and if you’re coming from 2010 or prior models you’re going to experience gigantic gains. This is really a great time to be an Apple fan, if you are going to upgrade soon don’t forget that any Mac bought between now and July also comes with a free copy of OS X Mountain Lion when it’s released next month.

2012/06/11

Apple Revealed: Next Generation MacBook Pro with 15,4" Retina Display


Apple revealed an all new “next generation” MacBook Pro at WWDC 2012 today, it’s the first retina Mac to be made available and comes in addition to their standard MacBook Pro line. The enclosure looks similar to existing unibody MacBook Pro models, though it is significantly thinner and lighter than any previous models.

The specs and features are very impressive and represent some significant engineering, here is what we know so far:
  • 15.4″ Retina Display at 2880×1800, 220 pixels-per-inch density
  • Quad-core i5 and quad-core i7
  • GeForce GT 650M with 1GB VRAM
  • 8GB RAM standard, supports up to 16GB RAM
  • 256GB SSD standard and up
  • 7 hour battery life
  • HDMI port
  • Dual ThunderBolt ports
  • USB 3.0
  • 0.71″ thin
  • 4.46lbs
  • $2199 and up
Shipping begins today. We will update with more information as it becomes available from Apple.

2012/05/29

Available Now, ROM for ASUS Transformer Pad TF300


It has only been a few days since ASUS released the bootloader unlock tool for the Transformer Pad TF300 and users of the somewhat budget-friendly tablet can already play with an experimental build of CyanogenMod 9, courtesy of XDA developer XpLoDWilD of Team HackSung.

Even though the Transformer Pad TF300 ships with Android 4.0, a lot of users would prefer a custom ROM such as CM9, which is based on Android 4.0.4, for its amazing extra features and for the well-known improvements in device performance. After all, there is a reason CyanogenMod is the most popular custom ROM available to Android users.


This is an experimental build and comes with its fair share of issues, such as:

  • Build #1 had issues with the camera and WiFi not working and MTP (file transfer) not functioning. Files from the computer could be transferred to the device, but not the other way around.
  • Build #2 fixed the issues with WiFi and the camera. MTP issues still persisted.
  • It is currently on Build #3 but there is no official indication yet as to whether the file transfer issues have been sorted out, but some user comments on the thread suggest that this might be the case.
  • Some flashers have had some trouble with getting their GPS to work. 

If you would like to play around with the experimental build of CyanogenMod 9 on your ASUS Transformer Pad TF300, you can find download and installation instructions on the original thread. If you are interested in flashing CM9 to your Android device, you can find out more about CyanogenMod, as well as a list of supported devices, here.

Any flashing of custom ROMs, whether experimental or Final release, comes with a standard disclaimer. There is always a slight chance that something might go wrong, leaving you with a very expensive rock. Always remember to create a back up, and a little technical familiarity with the process is recommended. Rooting your device, which is a requirement to flash a custom ROM (if you didn’t know that, please don’t try this alone) also voids your warranty.

There is now another reason to pick up the mid-range ASUS Transformer Pad TF300, which boasts impressive specifications including a display with 1280×800 resolution and a 1.2Ghz quad-core Nvidia Tegra 3 processor. You can pick up a WiFi-only version of the device from Amazon for $399.99.

2012/05/20

List Top 10 Notebooks Now

List of the best notebooks available right now Laptopmag version. For your convenience they are sorted by how you would use them, so you can be sure you’re getting what you need. As newer and better machines come out, rest assured we’ll update this list accordingly.

Best Value Notebook: HP Pavilion g6

The HP Pavilion g6-1c77nr 15-inch laptop offers bargain-hunters plenty of pep for everyday computing in a handsome design.
Lowest Price: $588
  
Best All-Purpose Notebook: Dell XPS 14z
Dell's XPS 14z laptop offers fast performance in a sleek aluminum chassis.
Lowest Price: $979

Best Thin-and-Light: Apple MacBook Pro 13”

The most well-rounded 13-inch notebook gets a serious speed boost and lasts even longer on a charge than its predecessor.
Lowest Price: $1,069

Best Ultrabook: ASUS Zenbook UX31

The ASUS Zenbook UX31 is a gorgeous ultrabook that offers snappy performance and strong audio.
Lowest Price: $1087

Best Ultraportable: Apple MacBook Air 13-inch

The ultimate 13-inch notebook (Apple MacBook Air) gets even better with a faster Core i5 processor, backlit keyboard, and Thunderbolt support.
Lowest Price: $1,549

Best Gaming Notebook: Alienware M17x

Record-breaking performance, superslick design, wireless HD streaming, and five hours of battery life. Yup, this gaming notebook is pretty much perfect.
Lowest Price: $2,099

Best Small Business Notebook: Lenovo ThinkPad Edge E420s


 The 14-inch Lenovo ThinkPad Edge E420s combines a dash of style with an excellent keyboard and all-day endurance.
Lowest Price: $749   

Best Business Notebook: Lenovo Thinkpad T420

The Lenovo ThinkPad T420 combines solid speakers, a great keyboard, and a hi-res screen with epic 10-hour battery (thanks to a nine-cell extended battery), all in a durably designed 14-inch frame.
Lowest Price: $799

Best Multimedia Notebook: HP Envy 15

The redesigned HP Envy 15 offers solid performance, excellent audio, and a bright full HD display in a beautifully made chassis.
Lowest Price: $1,299

Best Desktop Replacement: HP Envy 17 (2012)

 
The HP Envy 17 offers powerful performance, top-notch audio, long battery life and a full 1080p display in a stylish package.
Lowest Price: $1589


Copyright © 2014 Deepersolids. Designed by OddThemes