BREAKING NEWS
Showing posts with label iTunes. Show all posts

2022/04/21

Activate Feature Voice Isolation with FaceTime on Mac

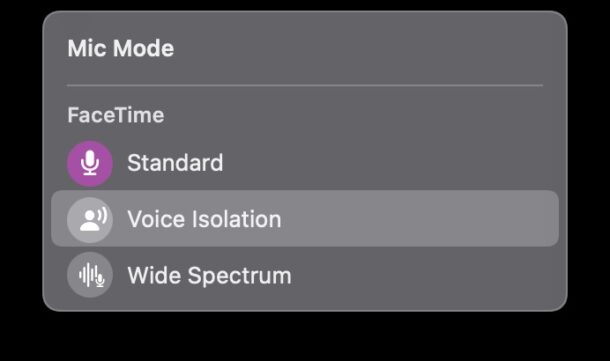
 Voice Isolation mode allows FaceTime on the Mac to emphasize your voice while on FaceTime calls, thereby reducing background noises and sounds. This is a nice feature if you have some background noise going on that may drown out your voice when talking or make you otherwise difficult to hear, whether that’s a loud fan running in the background, a cat meowing, dog barking, a neighbors bad music blasting, or any such situation. You can use this on any FaceTime call, whether it’s video, audio, or group chat.

You’d be forgiven for failing to find any setting for voice isolation or background noise reduction while digging around in the FaceTime preferences, because that’s not where the capability resides. Instead, you use the Control Center, as we’ll demonstrate.

How to Reduce Background Noise in FaceTime on Mac with Voice Isolation

This feature is only available on the latest versions of macOS system software (12.0 or later), so if you haven’t updated yet you will need to do that before having access to the feature.

        1. Open FaceTime on the Mac if you haven’t done so already

        2. Now open Control Center on the Mac by clicking on the little switches icon in the menu bar

        3.  Click on “Mic Mode” to switch the microphone mode


        4. Choose “Voice Isolation” from the microphone mode options


        5. Return to FaceTime and make your FaceTime call as usual, whether video or audio

It’s a little curious that you have to go to Control Center to access the microphone mode to aim for background noise reduction in a FaceTime call, but that’s where the toggle is located. Perhaps in the future there will also be an easy option directly from the FaceTime call or app itself.

This is a feature that is available in macOS Monterey and newer, so if you’re on an earlier version of MacOS you won’t find the feature available.

This feature is really useful if you spend a lot of time making FaceTime calls, whether for personal or professional purposes. You’ll find it works pretty well.

While we’re covering the Mac here, you can also use background noise reduction with FaceTime calls on iPhone and iPad too using the same technology to isolate your voice and reduce background sounds.

Try it out, it works really well. 

You can further improve performance by using a microphone, AirPods, or even the wired EarBuds. In testing with a set of AirPods, I was able to run a vacuum cleaner while chatting on a call, and the person said they couldn’t hear the vacuum at all.

This feature is useful enough that it’s a little surprising it isn’t enabled by default for calls, since most people are making calls to hear a person chat, and not the background noise. Perhaps that will change down the road.


Red: OsxDaily


2013/09/01

How to See Proceses Are Running in the Background of iOS

iOS platform does not have an Activity Monitor or task manager the way that desktop Macs do within OS X, but if you’d like to see what apps and processes are running in the background of an iPhone, iPad, or iPod touch, you can do so using a few different methods. For most users, simply showing the multitasking bar is sufficient, but the curious can also reveal system-level processes using alternate methods with a third party app or, for users who have jailbroken their devices, the command line.


1: The Basic iOS Task Manager


Just about every iOS user is probably aware of the task manager by now, which is accessed by double-clicking the Home button. The row of icons across the bottom show what apps are running in the background, and you can flip left or right to see more of them.


The task manager only shows apps though, and if you were hoping for something a bit more specific or technical, you’ll need to turn to another solution from a third party.

2: Use a Process App like DeviceStats


DeviceStats is a free third party app that may not be the prettiest thing in the world, but it works to show you which processes are actively running in the background of an iOS device, including daemons and background tasks.

Launching DeviceStats on an iPad, iPhone, or iPod touch will show a variety of tabs and options, but what we’re interested in is the “Processes” tab, which will also have a red badge on it to indicate the total number of processes running.

Scrolling through the list should reveal some familiar names of apps that you have open, things like Camera, Calculator, Videos, Photos, Preferences, Music, etc, and there will also be many tasks shown that are background processes, system tasks, and daemons.
Nothing listed within DeviceStats is directly actionable through the app itself, meaning that even if you identify a process you can’t really do anything about it unless it’s a standard app. Standard apps can be quit as usual, or killed (forcibly quit) through direct measures. There is no way to kill or quit out of background daemons and tasks running within iOS, however.

3: Using ‘top’ or ‘ps aux’ from the Command Line – Jailbreak Only

Users who have jailbroken their iOS devices can access the command line directly, either by using an app like MobileTerminal or by connecting directly to the device through SSH.
Once connected through the command line, you can use the ‘top’ or ‘ps aux’ command to see all active processes. “top” will provide a live updated list of processes, whereas ‘ps aux’ will print a snapshot of all processes and daemons, but not update any live CPU or memory usage. Processes that have been identified by ps or top can also be killed directly through the command line, but that may have unintended consequences for the iPad, iPhone, or iPod touch, and cause it to freeze up or crash, requiring a device reboot. Again, this is only accessible through jailbroken devices, which makes this option fairly limited.

2012/06/21

How to Backing Up Your iPhone Contacts Without iTunes


Anytime you use iCloud or iTunes to back up an iPhone or iOS device, the Contacts will be backed up automatically assuming the default settings are preserved. If you want to store an additional backup outside of iTunes and iCloud however, by far the easiest way to do that is with Address Book.

This will create a portable vCard file that contains all contact information, this can be stored anywhere as a manual backup and it can also be sent to other devices and imported to other phones, operating systems, email clients, and much more.
  1. Launch Address Book from the Applications folder
  2. Pull down the “File” menu and go to “Export” and then to “Export vCard”       
  3. Set the save destination and name the .vcf file something like “Contacts-Backup”

The file you just exported is the contacts list backup. The vCard format is widely accepted and can be imported into just about anything else while preserving all names, emails, phone numbers, and whatever other data you had entered.

In fact, if you attach the resulting .vcf file to an email and send it to another iOS device, Windows phone, or Android, you can actually transfer all the contacts to a new phone without using iTunes at all too. This is handy if you want to setup a new phone with only the contacts intact, are sharing contacts with a partner, or you are temporarily using another device and don’t want to manually sync it with a bunch of other stuff.

You can also easily send single contacts directly from iOS if you wish to back up a unique contact or just share it with someone else.

How to Downgrade iOS 6 Beta to iOS 5.1.1

If you went ahead and installed iOS 6 beta and determined the buggy nature of the first developer release isn’t for you, it’s time to downgrade. Most developers should know how to do this already, but if not this process is easy and you’ll be back to running iOS 5.1.1 in no time at all.

Downgrading is identical on an iPhone, iPad, or iPod touch.
  1. Turn the device off, connect it to the computer via USB, and launch iTunes
  2. Place the iOS device into DFU mode: with the device off, hold down the Power and Home buttons together for 10 seconds then release the power button, continue holding Home button until iTunes notifies you of a device in recovery mode being detected. The devices screen should stay black as if turned off.
  3. Restore within iTunes through either method a or b:
    • a: Restore from the iOS 5.1.1 backup you made prior to installing iOS 6 beta
    • b: Restore to iOS 5.1.1 IPSW by Option-Clicking the “Restore” button, and then restore from iCloud backup when finished
  4. Let iTunes restore back to iOS 5.1.1, the device will reboot when finished

Typically you can’t downgrade iOS versions so easily, but because Apple is still signing iOS 5.1.1 this allows downgrading to commence with minimal effort.

Troubleshooting the Downgrade:
If you get any strange errors (3194, 1013, etc) when trying to restore, you probably have Apple’s servers blocked in your hosts file. This is relatively common for people who jailbroke a device at some point in their iOS usage. Remove any blocks to Apple’s servers from /etc/hosts and try again.

2012/06/11

on WWDC 2012: New Macs, OS X Mountain Lion, iOS 6, MacBook Pro, etc


If you don’t have time to watch the WWDC 2012 keynote video, here’s a quick summary of everything major that was announced at WWDC and also a few things that were quietly updated behind the scenes. New Macs, new operating systems, new apps, it was a big day for Apple.

Macs & OS X Mountain Lion

  • Next-Generation Retina MacBook Pro released, starts at $2199 and features a 15″ whopping 2880×1800 display while weighing 4.4lbs in a thinner unibody enclosure. Quad-core Ivy Bridge CPU’s, 8GB RAM and SSD standard. It’s freakishly powerful and attractive, hide your credit card or else you will probably buy one.
  • MacBook Air gets updated at both 11″ and 13″ models, 4GB RAM standard and accepts maximum 8GB RAM, Ivy Bridge CPU, USB 3.0, Intel HD 4000 GPU, faster SSD drives, FaceTime HD camera, all models $100 cheaper. Decent update to great Macs.
  • Existing MacBook Pro 13″ and MacBook Pro 15″ models got minor spec updates, Ivy Bridge CPU’s, Nvidia 650M GPU, it’s a matter of opinion but compared to the new Retina MacBook Pro and update MacBook Air line the MacBook Pro is now officially boring.
  • OS X Mountain Lion release set for next month, priced at $19.99 and a single purchase installs on all of your Macs. As we mentioned a while back, you can upgrade directly from Snow Leopard to Mountain Lion too. OS X 10.8 also has over 200 new features, heavy iCloud integration, iMessage, Share Sheets, Power Nap, and much more.
  • OS X Mountain Lion Dev Preview 4 is now available for developers.
  • Mac Pro got a quiet minor update so boring that it’s barely worth mentioning.
  • MacBook Pro 17″ was silently discontinued. But did we mention the Retina MacBook Pro 15″?

iOS 6 and iOS Related

  • iOS 6 Announced: Everyone knew it was coming but iOS 6 was officially announced at WWDC, along with a loose release date of “Fall” which probably coincides with whenever the next iPhone will arrive. Over 200 new features are packed into the update.
  • New Maps app with turn-by-turn directions, crowd sourced traffic updates, and more
  • FaceTime comes to 3G and 4G networks
  • Siri gets major updates and improvements, can launch apps.
  • Siri comes to iPad 3 with iOS 6
  • Many new cars will have Siri integration, Apple working with auto manufacturers to bring Siri buttons directly into the steering wheel of upcoming cars, support from a huge range of manufacturers
  • iOS 6 beta 1 for developers is now available to download.
  • iPad “Smart Case” released, it’s basically a Smart Cover with rear protection as well.

Mac & iOS Related

  • New AirPort Express was introduced
  • Back to School Promo starts today for students, $100 iTunes gift card for a new Mac purchase, and $50 with a new iPad purchase
  • iTunes 10.6.3 is out, has bug fixes and required for installing the iOS 6 beta
And that’s about it.

Update iTunes 10.6.3 Release Now


Apple has released iTunes 10.6.3 for all to enjoy. Though it’s a minor point release, it includes a variety of important bug fixes for behavior both within iTunes and for when syncing iOS devices to iTunes. iTunes 10.6.3 is also a necessary update for any developer wanting to install iOS 6 beta 1.

You have three possible ways to update to iTunes 10.6.3:

iTunes updates can take a while to propagate, making downloading from Apple the quickest way to get the newest version. If you download from the official iTunes website you do not need to enter an email address, instead click the giant blue download button on their site to begin. For OS X the download weighs in around 170MB.

2012/06/07

How To Redownload & Reinstall Apps on iOS


You can redownload and reinstall any previously purchased apps that have since been deleted from an iOS device, even if you deleted them a long time ago or never even installed them in the first place. Here is how:

  1. Launch “App Store” on the iOS device
  2. Tap on the “Purchased” tab at the bottom of the screen (iPhone & iPod users tap “Updates” and then “Purchased”)


  3. Tap “Not On This iPad” or “Not On This iPhone” to see the list of apps that are not installed on the device
  4. Find the app you wish to redownload and reinstall and tap the download icon, it’s a cloud with an arrow on it

This is what you’d do if you want to reinstall an app you deleted to quickly free up some space on an iPhone, iPad, or iPod that has run out of storage capacity. Likewise, this is the same procedure to restore an app that was accidentally deleted.

Another side to this is you can download and install apps you bought or owned on a different iOS device onto a new different one. All of this is possible thanks to the generous App Store policy that lets you buy an app once and then have free recurring downloads available for free, as long as it’s on an authorized device using the same Apple ID.

How To Enable Closed Captioning on iPhone, iPad, and in iTunes

Closed Captioning places written text at the bottom of video content, allowing for anyone to read along with the video rather than listen to the audio. This is an essential feature for certain accessibility purposes and for individuals who are hard of hearing, but it’s also just a useful feature to enable if you want to watch a movie silently and read subtitles.

We’ll cover how to enable Closed Captioning on the iPhone, iPod, iPad, and also in iTunes for videos on Mac OS X and Windows.

Enable Closed Captioning on iOS Videos

This applies to all iOS devices, including iPad, iPhone, and iPod touch:
  1. Launch “Settings” and tap on “Video”
  2. Next to “Closed Captioning” slide the switch to ON

Turn On Closed Captioning in iTunes

This applies to Mac OS X and Windows:
  1. Launch iTunes and open Preferences from the “iTunes” menu
  2. Click the “Playback” tab and check the box next to “Show closed captioning when available”


Find Closed Caption Supported Video in iTunes

Enabling closed captions is only useful if you have video that supports it however, and thankfully many videos offered through iTunes do. The process of finding compatible video is the same in iTunes on iOS, OS X, and Windows:
  1. Open iTunes and using the search box in the upper right corner, type “closed caption” and hit return
  2. All video content that is returned should support closed captioning, individual videos can be verified by choosing them and looking for the familiar “CC” logo in the description

With Closed Captions enabled all supported videos will use them when played through the Videos app or iTunes.

Oddly, Closed Captioning does not appear to be widely supported in the iTunes Trailers app for iOS. This seems like an unusual oversight for Apple, who is usually very good at maintaining accessibility options, though many of the features have to be enabled separately on a per-case basis, such as text to speech in iOS, screen zoom in iOS and OS X, and the aforementioned closed captioning abilities.
 
Copyright © 2014 Deepersolids. Designed by OddThemes