BREAKING NEWS
Showing posts with label iPad. Show all posts

2022/06/22

You running on iOS 16 Beta now?, how Downgrade it to iOS 15

 Did you install the iOS 16 beta but now you’re having second thoughts about running it? If you want to downgrade from iOS 16 beta and revert back to a stable iOS 15 build, you can certainly do that.


The method covered here will downgrade an iPhone from iOS 16 back to the latest stable version of iOS 15, however it will erase the iPhone in doing so. This means if you did not create a backup to the computer from iOS 15 before installing iOS 16 beta, you will lose everything on the iPhone by downgrading.


If you are not comfortable with losing everything on the iPhone and do not have a compatible backup available, you should not attempt to downgrade the iPhone from iOS 16. Instead just continue on iOS 16 beta

How to Downgrade iOS 16 Beta to iOS 15.x

This method erases the iPhone to revert from iOS 16 to iOS 15. If you have a backup made from iOS 15 you can then restore that to get your stuff back. If you do not want to erase and lose all data on your iPhone, do not proceed with this method.

    1. Connect the iPhone or iPad to the Mac with a Lightning cable

    2. Open the Finder on Mac

    3. Put the iPhone into Recovery Mode by performing the following sequence: press and release Volume Up, press and release Volume Down, press and hold the Power/Side button until you see the restore screen on the Mac

    4. You’ll see a dialog window that says there’s a problem with the iPhone and giving you the option to restore the device, click on “Restore” to erase iOS 16 beta and restore iOS 15 to the iPhone

    5. Let the restore process complete, it can take a while

When the downgrade has completed, the iPhone will boot back into a clean install of the latest version of iOS 15 that is available, as if the iPhone was brand new. The iPhone will have nothing on it, having been erased.

Assuming you have a backup available that is compatible with iOS 15 on the Mac or archived, you can restore from that backup to get your old stuff back. 

Because this process erases the iPhone and requires a backup from iOS 15 be available to restore their stuff from, this may not be suitable for all users, because most people don’t like to lose everything on their iPhone. But if it’s a secondary iPhone or a test device, you may not mind.


Red: OsxDaily


Can I Play Fortnite on iPhone with GeForce ?

 You can play Fortnite on iPhone again, thanks to the impressive capabilities of GeForce Now. No, the Fortnite app is not back on the App Store for iPhone or iPad, but it is available to play by streaming from the web through Safari and the Geforce Now service, and believe it or not it works pretty well.

ou can play Fortnite for free but you’ll have limited game time of an hour, and performance is limited to 1080p, which depending on your network connection may be suitable anyway. Or you can pay for for better performance, unlimited game time, and for access to other games too.

How to Play Fortnite on iPhone with GeForce Now

    1. Go to play.geforcenow.com in Safari on iPhone

    2. Follow the onscreen instructions to add GeForce Now to your home screen as a bookmark

    3. Go to the home screen and launch the Geforce Now web app

    4. Sign up for a GeForceNow account if you don’t already have one (you can make a free account with the aforementioned limitations)

    5. Choose Fortnite, and tap Play, and away you go

As long as you have a decent internet connection, you’ll find gameplay is pretty good, even with the limited resolution at the free level. It’s certainly playable.


Whether or not you consider this better than using Xbox, Switch, or another platform to play Fortnite is up to you, but if you’ve been wishing you could play it on your iPhone all over again, this is another solution available.

If this seems familiar, it may be because this has been possible on the Mac and iPad by spoofing the browser user agent, but now it’s officially supported.

And for what it’s worth, you can also play Fortnite on your iPhone or iPad through a web browser with Xbox cloud gaming too. The choice is yours! Have fun and happy gaming.


Red: OsxDaily


Step by step Install MacOS Ventura

 MacOS Ventura beta is available to install and run for Mac users who are interested in trying out the developer version of the upcoming Mac operating system.


Installing the Ventura beta is pretty easy, though it’s currently only available to registered Apple Developers. Other users will have to wait until the public beta is released next month, or for the final version in the fall.

Requirements for Installing MacOS Ventura Beta

You will need access to the macOS Ventura beta profile, which requires a developer account. Technically you can find the profiles online, but don’t do that, just wait for the public beta next month.

You will also need a Mac compatible with macOS Ventura, which is a much more strict list than prior MacOS versions. Any Mac from 2017 or later can run Ventura, whereas any Mac from before that can not. Specifically, any iMac from 2017 or newer, MacBook Pro from 2017 or newer, MacBook Air from 2018 or newer, MacBook from 2017 or newer, Mac Pro from 2019 or newer, or iMac Pro can run macOS Ventura.

It’s also not ideal to run beta system software on primary hardware, so preferably you have a test machine to try Ventura out on. And don’t forget that removing Ventura means you have to erase the entire Mac, you can’t simply reinstall Monterey.

How to Install macOS Ventura Beta on a Mac

Be sure to backup your Mac with Time Machine or otherwise before installing macOS Ventura beta. Failure to backup could result in permanent data loss.

     1. Visit the Apple Developer downloads site and login with your Apple ID, then choose MacOS 13 beta (Ventura)

    2. Choose to “Install Profile” to download the macOSDeveloperBetaAccessUtility.dmg file to your Mac

    3. Mount macOSDeveloperBetaAccessUtility.dmg and run the package installer, this installs the MacOS Ventura 13 beta profile onto the Mac

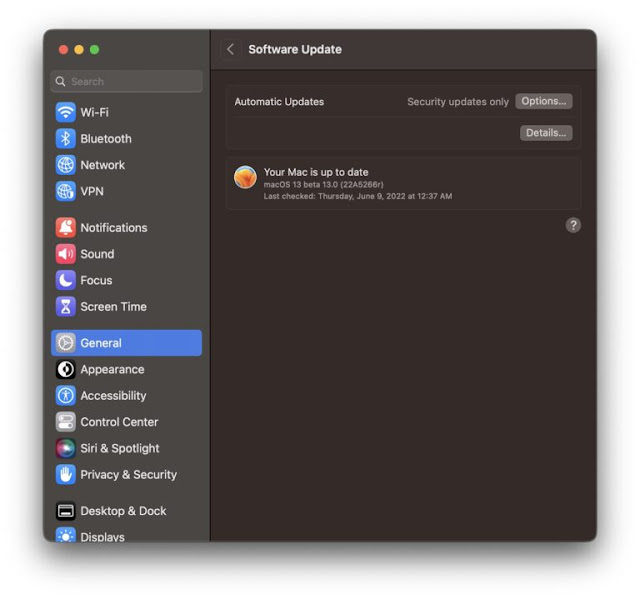
    4. Open System Preferences and go to “Software Update” to find the MacOS 13 Beta available to download and install


     5. Choose to “Upgrade Now” for macOS 13 beta *


     6. Let the macOS Ventura beta installer download, when finished it will reboot the Mac automatically directly into installing

    7. Proceed with the installation as usual, there are no onscreen prompts as Ventura just immediately installs

* Important Note: macOS Ventura beta immediately starts installation and reboots directly to installing over the current operating system, it is not like prior macOS versions where an installer application is downloaded into /Applications/ that you can manually quit.

** Important Note 2: You can also not remove or uninstall macOS Ventura easily, even by booting into Recovery Mode which will only offer the option to reinstall macOS 13. If you want to remove macOS Ventura beta from a Mac, you have to erase the entire hard disk and then use a USB installer drive for macOS Monterey to install that and start over again.

MacOS 13 Ventura beta will restart a few times to complete installation, and when done you will boot directly into Ventura. Again, there is no opportunity to select a different target disk to install Ventura onto, it just starts installing right away as soon as you click “Upgrade Now” from the Monterey system preferences.  


MacOS Ventura is obviously in early beta thus it’s not going to perform as well as expected, and you should anticipate bugs and crashing apps and unusual behavior. Also, many of the features will be refined as the beta period continues, so don’t be surprised if things change and shift as the versions continue to evolve towards the final release this fall. Hopefully things like the System Settings (replacing System Preferences) changes back to a more Mac like interface as well, since as of now it looks like someone copy/pasted the iOS Settings onto the Mac and looks very out of place and is not intuitive at all. There’s also something strange about the fonts display, maybe they system font is thinner, but whatever it is is causing me eye strain. Overall, I would not recommend installing the Ventura beta at this point, for anyone except true developers working on app compatibility.


Red: OsxDaily


2022/05/18

iPad Air 5, how to to Restart & Force Restart this Device

 Occasionally you may need to shut down, restart, or force restart a device, and iPad Air 5 is no exception.


 Whether it’s force restarting because of a frozen app, troubleshooting an issue, restarting for any number of reasons, or shutting down the iPad Air for a flight, we’ll cover how you can perform these common tasks for the iPad Air 5.

How to Force Restart iPad Air 5

You can forcibly restart an iPad Air 5 by initiating a series of button presses using the physical power and volume buttons on the device. Here’s the sequence to force restart:

    1. Press and release Volume Up

    2. Press and release Volume Down

    3. Press and hold the Power button until you see an  Apple logo on the screen

After you see the  Apple logo, the iPad Air will boot up as usual. Sometimes a forced restart can take a little longer than a regular restart.

This is a useful technique to know, because it turns out that the method of force restarting the iPad Air 5 is also used on any modern iPad that has Face ID and/or without Home button, including M1 iPad Pro, iPad Pro,, and iPad Mini. And, you use the same sequence to force restart any modern iPhone with Face ID as well.


How to Restart iPad Air 5

A graceful restart of iPad Air can be achieved by powering off and back on again:

    1. Press and hold the Power button and the Volume Up button until a “Slide to Power Off” shows on screen

    2. Swipe to turn off the iPad Air 5

    3. Wait a few moments, then hold down the Power button to turn the iPad Air 5 back on, effectively restarting the device

Basically turning the iPad Air 5 off, then turning it back on again, is how you restart the device.

How to Shut Down iPad Air 5

If you want to turn off iPad Air 5 completely, you can do that by shutting down the device:

    1. Press and hold the Power button and the Volume Up button until a “Slide to Power Off” shows on screen

    2. Slide to turn off the iPad Air 5

With the power off, the iPad Air 5 is turned off. This will allow the device battery to last quite a while as it’s going unused, and the device will not connect to any networks while powered off.

You can also shut down the iPad Air through Settings, but currently there is no restart option in Settings.

The new model iPad Air 5 is a nice upgrade to the iPad line, and many users coming to the new iPad Air may be upgrading from a device with a Home button, which offers a different method of shutting down, restarting, and force restarting. Thus it’s reasonable to expect some users are unfamiliar with the new procedure for restarting and force restarting the fifth gen iPad Air. Once you learn how and practice it a few times, it will become second nature.


Red : OsxDaily


2022/04/21

Activate Feature Voice Isolation with FaceTime on Mac

 Voice Isolation mode allows FaceTime on the Mac to emphasize your voice while on FaceTime calls, thereby reducing background noises and sounds. This is a nice feature if you have some background noise going on that may drown out your voice when talking or make you otherwise difficult to hear, whether that’s a loud fan running in the background, a cat meowing, dog barking, a neighbors bad music blasting, or any such situation. You can use this on any FaceTime call, whether it’s video, audio, or group chat.

You’d be forgiven for failing to find any setting for voice isolation or background noise reduction while digging around in the FaceTime preferences, because that’s not where the capability resides. Instead, you use the Control Center, as we’ll demonstrate.

How to Reduce Background Noise in FaceTime on Mac with Voice Isolation

This feature is only available on the latest versions of macOS system software (12.0 or later), so if you haven’t updated yet you will need to do that before having access to the feature.

        1. Open FaceTime on the Mac if you haven’t done so already

        2. Now open Control Center on the Mac by clicking on the little switches icon in the menu bar

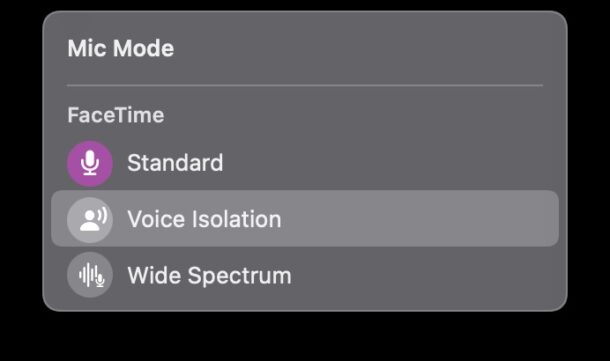
        3.  Click on “Mic Mode” to switch the microphone mode


        4. Choose “Voice Isolation” from the microphone mode options


        5. Return to FaceTime and make your FaceTime call as usual, whether video or audio

It’s a little curious that you have to go to Control Center to access the microphone mode to aim for background noise reduction in a FaceTime call, but that’s where the toggle is located. Perhaps in the future there will also be an easy option directly from the FaceTime call or app itself.

This is a feature that is available in macOS Monterey and newer, so if you’re on an earlier version of MacOS you won’t find the feature available.

This feature is really useful if you spend a lot of time making FaceTime calls, whether for personal or professional purposes. You’ll find it works pretty well.

While we’re covering the Mac here, you can also use background noise reduction with FaceTime calls on iPhone and iPad too using the same technology to isolate your voice and reduce background sounds.

Try it out, it works really well. 

You can further improve performance by using a microphone, AirPods, or even the wired EarBuds. In testing with a set of AirPods, I was able to run a vacuum cleaner while chatting on a call, and the person said they couldn’t hear the vacuum at all.

This feature is useful enough that it’s a little surprising it isn’t enabled by default for calls, since most people are making calls to hear a person chat, and not the background noise. Perhaps that will change down the road.


Red: OsxDaily


2015/03/24

Released, iOS 8.3 Beta 4 to Developer and Public Beta to Users

Apple has released the fourth beta release of iOS 8.3 to those registered with the iOS developer program, or who are participating in the iOS Public Beta. The build is versioned as 12F5061 and is available now for compatible iPhone, iPad, and iPod touch devices.

The simplest way to install iOS 8.3 beta 4 is through the Over-the-Air software update mechanism on the iOS device. This is accessible through Settings > General > Software Update. As always, back up the device before updating system software, this is particularly important when that iOS software is a beta version. Additionally, it is not advised to run beta software on a primary device.


The new beta build IPSW can also be downloaded from the iOS Dev Center for those registered with Apple.

iOS 8.3 continues to focus on improvements, bug fixes, and feature enhancements, and the version is expected to include new diverse Emoji icons, wireless CarPlay connectivity, Apple Pay improvements, new languages for Siri, and Google 2-factor authentication support.

While this is the fourth beta of iOS 8.3 overall, this is the second release available to Public Beta users of iOS. There is no known timeline for iOS 8.3 being released to the general public, but one could reasonably expect a final version to arrive before Apple Watch debuts.

Separately, Apple has also made Xcode 6.3 beta 4 available to iOS developers.

red:Osxdaily 

2015/03/23

Released OS X 10.10.3 Yosemite Beta 5, anyone dare testing it?

Apple has released a fifth beta version of OS X Yosemite 10.10.3 to those participating in the OS X
Public Beta program, or registered in the Mac Developer program. The new build arrives as build number 14D113c and continues to include a focus on the new Photos app for OS X, along with other bug fixes and feature improvements.

The new beta version is available to download now from the software update mechanism of the Mac App Store, refreshing the Updates tab should reveal the download if it’s not seen immediately.


An update to the Yosemite Recovery drive is also available with the OS X 10.10.3 beta 5 download.

There is no known timeline for OS X 10.10.3 to debut, though Apple has stated that the Photos app will be available sometime in “early 2015″. With that said, the beta release schedule is clearing picking up steam, and it’s quite likely that we’ll see a public release of OS X 10.10.3 sooner than later. Apple typically goes through multiple beta versions before unveiling a final build to the public.

The new OS X Photos app will replace iPhoto for Mac, the app looks and feels quite similar to the Photos app experience in iOS that many users have become accustomed to.


red:Osxdaily

2013/09/06

Tips to Tell if Someone Snooped Your iPhone / iPad & Read Emails, Messages, Call Log


If you suspect someone is snooping through your iPhone call log, messages, email, or through other apps, you can set a simple trap of sorts to potentially catch such intrusions on privacy. The idea behind this is pretty simple: quit out of all apps to leave the task bar empty, then check on the multitask screen to see if someone used an app. Since most people don’t bother to check what apps are running, they will unintentionally leave their app usage traces behind.

Here’s how to set the app-trap on any iPhone, iPad, or iPod touch, and how to check it later to see if someone was using apps and meddling about your business:

Setting the Snoop Trap in iOS

If you’re convinced (or paranoid) that someone is peeking at your apps, messages, or private details, you can do this every time you leave an iOS device alone:
  • Double-click the Home button to summon multitasking
  • Tap and hold on an app icon then tap the red (-) button to kill the apps – you can use multitouch on the red buttons to quit multiple apps at the same time to speed up the process
  • With a blank multitask screen, tap the Home button again to return to the home screen as usual

Now you just need to leave the iPhone, iPad, or iPod alone, placed somewhere that you think the snoop may use the device to poke around in apps, messages, call logs, snap chats, whatever you are suspicious someone is being overly nosy with.
(Note: iOS 7 requires a swipe up on apps to kill them, the tap-and-hold function no longer works to quit apps. All else is the same, however)

Checking the Snoop Trap to See if Someone Used Your iPhone / iPad

After you have set the trap and suspect someone may have used the device, catching the snoop is quite simple:
  • Double-tap on the Home button again to summon the multitasking screen – if any apps appear in the menu then you know someone has opened them in your absence
In this screen shot example, someone launched the “Messages” app after all the other apps had been quit, indicating that someone used the iPhone and poked around in the messages application to read texts or iMessages:

Determining if someone read emails would be indicated by Mail, Gmail, Yahoo Mail, or whatever email client being left open. Call logs would be shown as the Phone app, and whatever other app(s) left open could be suggestive of someone poking around in there.
If multiple apps have been opened, the order in which they appear – from left to right – indicates which app was most recently used or gone through. You could be a bit more subtle and leave a series of apps in the task bar this way, then simply look for that sequence of apps to be out of order or rearranged to catch prying eyes.
Of course, if someone is savvy enough to check the multitasking bar or is aware of this app trap concept, they’ll be able to evade such tactics by quitting the apps again after browsing through them. Nonetheless, for the average iPhone, iPad, and iPod touch user, this should be sufficient to catch your average petty snoop of a curious little sibling, a suspicious partner, or an invasive roommate.
We’ve discussed similar tricks for the Mac to help determine if someone was opening files or applications, but unlike OS X, iOS offers no easily accessible system logs demonstrating unlock or wake records.

Preventing Privacy Invasions & Snoopers

The best way to prevent any snooping, poking about, or general invasion of your iOS device privacy is by using a pass word on your iPhone, iPad, or iPod touch, preferably setting a strong passcode that is alphanumeric and not easily guessed.

Finally, if you backup an iOS device to your computer through iTunes, be sure to enable backup encryption for the iPhone, iPad, or iPod touch to prevent determined parties from being able to easily gain access to the device backups, including text messages, call logs, and other personal data.
-
Heads up to CultOfMac for this busybody buster trick.
 
Copyright © 2014 Deepersolids. Designed by OddThemes