BREAKING NEWS

2022/04/21

Activate Feature Voice Isolation with FaceTime on Mac

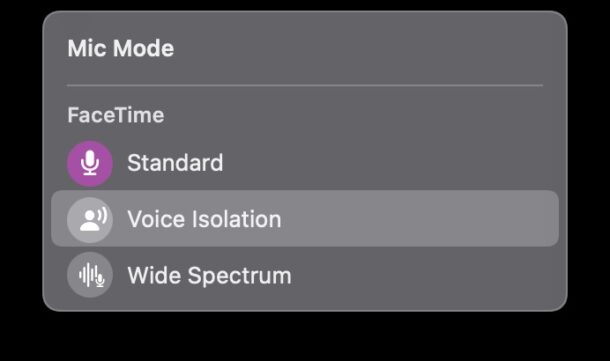
 Voice Isolation mode allows FaceTime on the Mac to emphasize your voice while on FaceTime calls, thereby reducing background noises and sounds. This is a nice feature if you have some background noise going on that may drown out your voice when talking or make you otherwise difficult to hear, whether that’s a loud fan running in the background, a cat meowing, dog barking, a neighbors bad music blasting, or any such situation. You can use this on any FaceTime call, whether it’s video, audio, or group chat.

You’d be forgiven for failing to find any setting for voice isolation or background noise reduction while digging around in the FaceTime preferences, because that’s not where the capability resides. Instead, you use the Control Center, as we’ll demonstrate.

How to Reduce Background Noise in FaceTime on Mac with Voice Isolation

This feature is only available on the latest versions of macOS system software (12.0 or later), so if you haven’t updated yet you will need to do that before having access to the feature.

        1. Open FaceTime on the Mac if you haven’t done so already

        2. Now open Control Center on the Mac by clicking on the little switches icon in the menu bar

        3.  Click on “Mic Mode” to switch the microphone mode


        4. Choose “Voice Isolation” from the microphone mode options


        5. Return to FaceTime and make your FaceTime call as usual, whether video or audio

It’s a little curious that you have to go to Control Center to access the microphone mode to aim for background noise reduction in a FaceTime call, but that’s where the toggle is located. Perhaps in the future there will also be an easy option directly from the FaceTime call or app itself.

This is a feature that is available in macOS Monterey and newer, so if you’re on an earlier version of MacOS you won’t find the feature available.

This feature is really useful if you spend a lot of time making FaceTime calls, whether for personal or professional purposes. You’ll find it works pretty well.

While we’re covering the Mac here, you can also use background noise reduction with FaceTime calls on iPhone and iPad too using the same technology to isolate your voice and reduce background sounds.

Try it out, it works really well. 

You can further improve performance by using a microphone, AirPods, or even the wired EarBuds. In testing with a set of AirPods, I was able to run a vacuum cleaner while chatting on a call, and the person said they couldn’t hear the vacuum at all.

This feature is useful enough that it’s a little surprising it isn’t enabled by default for calls, since most people are making calls to hear a person chat, and not the background noise. Perhaps that will change down the road.


Red: OsxDaily


The way to Enable or Disable Macro Camera Controls on iPhone 13 Pro

 You can choose to have manual macro camera controls, or use the automatic macro mode setting, on the latest top-end model iPhones including iPhone 13 Pro and iPhone 13 Pro Max. This can help you to take macro photos easier, and more suitable to how you use your iPhone camera.

With manual macro camera controls enabled, when the macro camera is available you can tap a flower macro mode option to enable the iPhone macro camera.

With automatic macro camera mode enabled, the macro camera will activate itself when it is available by moving the iPhone camera lens close to an object or subject.

How to Toggle Macro Camera Control On or Off on iPhone Pro

Here’s how to customize the macro camera controls on iPhone:

        1. Open the “Settings” app then go to “Camera”

        2. Scroll down and locate “Macro Control” and toggle the switch ON to enable manual macro camera controls, or toggle the switch OFF to enable automatic macro mode on iPhone camera


How you prefer this setting to be is up to you and how you use iPhone camera macro mode.

If you prefer more manual controls, you’ll likely want to enable the Macro Control option, since you can choose when to use Macro Mode on the iPhone camera or not.

If you’d rather have the iPhone take care of things on its own, disabling Macro Control allows the iPhone to enter or exit macro mode on its own whenever using the iPhone camera.

This setting is only available on the latest high end iPhone models, including iPhone 13 Pro, iPhone 13 Pro Max, or better.


Red : OsxDaily


Convert your Old Mac into a Chromebook with Chrome OS Flex

Ever wanted to use a Google Chromebook running the Chrome OS? If you have an older Mac laying around that isn’t getting much use, you may be interested in trying out Google Chrome OS Flex on the old Mac, which basically turns the older Mac into a Chromebook.  

One potential advantage to this is the Mac gets an operating system that still receives security updates, whereas some old Mac models that are otherwise perfectly great running machines may no longer receive MacOS security updates, and that matters to some users. You also get to tinker around with a different operating system, based on the Chrome web browser. And perhaps you’ll be able to breathe new life into that older Mac that’s otherwise collecting dust? 

A downside however, is that by installing Chrome OS Flex onto the older Mac, the Mac will no longer have MacOS on the computer, since Chrome OS becomes the operating system on that Mac.

Google Chrome OS Flex runs on any Mac from 2010 or newer, so you can get Chrome OS running on hardware that has long stopped being supported by Apple.

If converting an older Mac into a Chromebook appeals to you, you will need a USB flash drive that is 8GB or larger (this becomes the installer drive for Chrome OS), the Chrome web browser (this is where the initial config tool and installer is made), and the Mac must have at least 16GB of storage, and be from the 2010 model year or later.

How to Install Chrome OS Flex on Older Mac

To try this out yourself, you’ll need the Chrome browser. You will also need to be comfortable erasing everything on the old Mac because you need to erase MacOS and all data in order to install Chrome OS Flex on the computer. Do not proceed if you don’t wish to permanently erase that Mac, and do not proceed without a backup of your stuff.

        1. Launch the Chrome web browser on any Mac (you can use a different Mac to create the installer from the destination Mac)

        2. Get Chromebook Recovery Utility here for the Chrome browser and install the extension


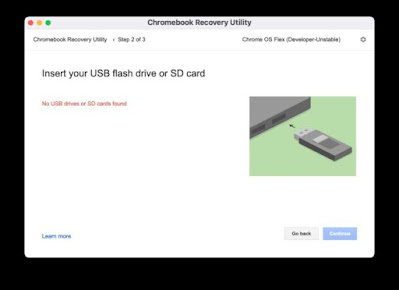
         3. Open Chromebook Recovery Utility within Chrome, and select “Google Chrome OS Flex” as the Chromebook you wish to setup


         4. Insert the USB drive you want to turn into the Chrome OS Flex installer then proceed with the creation of the installer drive 

        5. When the USB installer drive has finished being created, connect it to the Mac you want to format and turn into the Chromebook

        6. With the Chrome OS Flex USB installer drive connected to the Mac, reboot the old Mac and hold down the OPTION key, then select the Chrome OS installer from the boot options menu

        7. Proceed with the installation as shown on screen

        8. Your old Mac will boot into Chrome OS Flex when finished


 You’ll soon be booted into the Chrome OS Flex operating system, and the Chrome OS desktop.

Chrome OS is basically an operating system centered around the Chrome web browser, and you’ll have access to all of the Google apps and tools you’re familiar with, including the Chrome browser, Google Docs, Google Sheets, YouTube, YouTube Studio, Google Drive, Google Calendar, Google Meet, Gmail, and more.


 Red: OsxDaily


2022/04/20

How to Run Windows 11 for free on M1 Mac

 If you want to run Windows 11 on your M1 Mac, you can now do that, and perhaps best of all, you can run Windows 11 in a virtual machine on the M1 Mac entirely for free. 

We’ll be covering how to install, setup, and run Windows 11 ARM on any Apple Silicon Mac, whether it has an M1, M1 Pro, M1 Max, M1 Ultra, or any other M chip does not matter, it will work just fine thanks to the UTM app.


Note this particular walkthrough is geared specifically for Apple Silicon Macs. Intel Macs offer many other ways to run Windows 11 in virtual machines like within VirtualBox, VMware, Parallels, etc,

 step :

        1. Download the UTM app for free, it’s a virtualizer and emulator application, and drag to the Applications folder to install it on the Mac 

        2. Download the Windows 11 VM for ARM free from Microsoft here (you will need a Windows Insider login for this, which is free to sign up for if you don’t have one already)


       3. Open UTM on the Mac, then click the + plus button to create a new virtual machine

        4. Choose “Virtualize” from the ‘I Want to” screen, then select Windows


        5. Click the “Browse” button and select the Windows 11 VHDX ARM image you downloaded,             with “Import Image” selected, then click Next


         6. Choose the amount of RAM and CPU cores you want to designate to Windows 11 (recommend             to give 8GB RAM or more for better performance), then click Next again

        7. At the Summary screen, choose “Save”

        8. Now click the big Play button to boot the Windows 11 VM and begin setup

        9. Walk through the Windows 11 setup process as usual, choosing your region, account name, etc – Note that networking and internet will not work yet, that takes an additional setup process which             we’ll cover in a moment – thus choose that you have no network connectivity for now and let                 Windows 11 set itself up


        10. Wait a few minutes and Windows 11 will launch running in the VM on the M1 Mac

        11. To get internet access working in the Windows 11 VM, download the SPICE Guest Tools ISO here from the UTM website 

        12.  In the active Windows 11 VM, click the disc icon in the toolbar and choose CD/DVD Iso > Change > and select the spice-guest-tools-xxx.iso file you just downloaded


        13. Open the mounted D:\ drive in Windows Explorer, then run the SPICE Guest Tools installer in Windows, then restart the VM when installation is finished


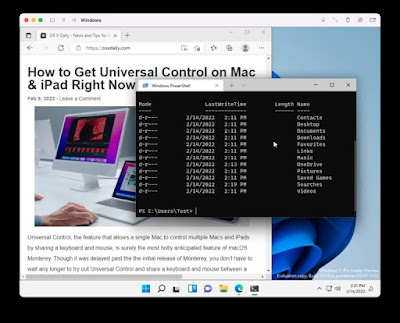
        14. The VM will reboot and Windows 11 will now be connected to the internet, confirm this by opening up the Edge browser and visiting a fantastic website


And there you have it, you’re running Windows 11 ARM on a Mac with an Apple Silicon processor.

Remember, you must install the SPICE guest tools to have internet access available in the Windows 11 virtual machine, and without it you will not be able to get the virtual machine online. 


Windows 11 ARM runs pretty well on a Mac, though performance with UTM may not be quite as good as some of the other virtualization tools you’ve become accustomed to elsewhere. But as a free solution that is simple to setup, this is more than workable and usable. 


Red : OsxDaily

2020/10/01

How custom padding in textfield on flutter

You can add contentPadding for setting padding of textfield. 
And add edgeinsets.fromLTRB for customize your padding from left, top, right, and bottom. 

i set all padding with 5, 

and this is first time my post with bloger on android.. 

thanks, 

2017/02/10

Why Camera Freezing on iPhone 7 and iPhone 7+ ? How Fixing it?

Some iPhone 7 and iPhone 7 Plus users have discovered their wonderful camera freezes on open and randomly does not work.


When this happens it’s quite obvious; the user attempts to open the Camera either from the lock screen or the Camera app directly, and instead of having access to the camera, either a stuck blank black screen will show up on the camera display or a blurred image will show up on the camera display, and the iPhone is unable to take any picture or video.

Given that most iPhone users rely on it as their primary camera, and the emphasis Apple continuously places on using the iPhone as a camera for all of your photography needs, this is a pretty annoying bug.

While there is no great way to resolve this problem, there is a rather blunt-force solution to fix the stuck iPhone 7 camera issue.

Forcibly reboot the iPhone.

Yes, a forced restart is a decidedly low-tech solution but it works. Unfortunately simply quitting the camera app is not sufficient, you must reboot the iPhone 7 or iPhone 7 Plus to get the camera to function reliably again.
If you have not rebooted the iPhone 7 or iPhone 7 Plus yet, it’s slightly different from restarting prior iPhone models; rather than holding down the Home button you hold down the lower volume button, here is how you reboot the latest iPhone 7 and iPhone 7 Plus models, which will fix the frozen camera problem:

  • Hold down Power button and the volume down button until the  Apple logo appears on the iPhone 7 / iPhone 7 Plus screen
Once the iPhone boots up again as normal, access the camera and it will work as intended (for a while anyway, it may randomly freeze up again and require another restart down the road). This is more of a temporary workaround than a true fix since it can happen again, so perhaps a future iOS update will permanently fix the issue.

Here are two examples of what a frozen iPhone 7 / iPhone 7 Plus camera looks like, I personally encounter this issue a few times a week on a device updated to the latest iOS version:

iPhone 7 Plus camera frozen on all-black screen:


 iPhone 7 Plus camera frozen on a blurred image:


The iPhone 7 freezing camera issue a well documented problem on YouTube and throughout various discussion forums on Apple support site and elsewhere on the web (1, 2, 3, 4, etc). Oddly enough, release notes in iOS 10.1 noted a bug fix for a similar camera app issue, but the bug persists in the latest versions of iOS including iOS 10.2 and 10.2.1 for some iPhone 7 and iPhone 7 Plus users.


It’s likely the freezing camera issue will be fixed once and for all in a future iOS software update for iPhone 7 and iPhone 7 Plus users, since it is probably software related and not a hardware problem. As always, be sure to keep your iOS devices updated to the latest software versions to receive these bug fixes. You can update iOS system software on an iPhone in the Settings app > General > Software Update.

Since almost all iPhone 7 and iPhone 7 Plus owners likely have their devices under warranty, another option is to contact official Apple Support and let see if they can offer a more permanent solution. Some reports online indicate Apple has swapped out cameras or the entire devices if the issue persists for some users, so if you frequently encounter the problem you may want to go that route.

Have you experienced the frozen camera issue? Did this work for you? Do you have another solution to resolve the frozen camera problem on iPhone 7? Let us know in the comments.


source: http://osxdaily.com
 
Copyright © 2014 Deepersolids. Designed by OddThemes